Python Threading Like a Pro


 Written by:
Nathan Rosidi
What is threading in Python, and what is it useful for? We’ll explain everything: what it is, how it works, and give you some code examples to get you started.
Understanding Python Threading
The concurrent execution of more than one sequential set is commonly known as "thread of execution”. Or simply "threading", if you want to use its pet name.
In the context of Python, threading is a built-in module that allows various threads to execute concurrently.
Threads run in the same unique memory heap. That way, each thread can access every variable and data structure of the program. While they do share the same heap space, each thread has its own stack.
With Python threading, you can increase the efficiency of I/O-bound programs, where the majority of time is spent waiting for input or output operations to complete.
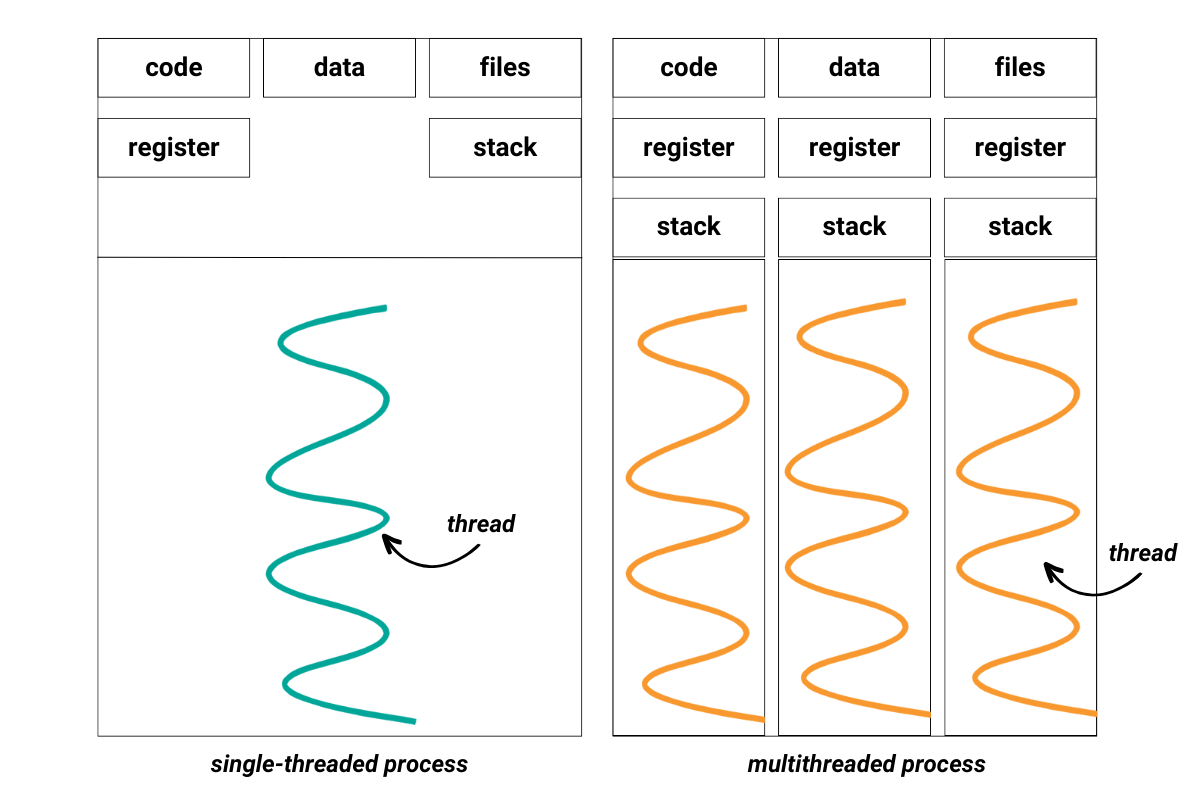
Your process can be single-threaded and multi-threaded. Python multi-threading means there are two or more threads started concurrently.
Here’s a simple visualization that shows these two approaches of Python threading.

Advantages and Use Cases of Python Threading
The main advantage of Python threading is that it allows programs to run simultaneously. Also, when a program is performing multiple tasks independently, this can be made easier by threading. It also uses the system resources more efficiently, which increases efficiency, and provides a smoother user experience.
The most typical use cases of Python threading are:
- I/O-bound programs: The I/O-bound program is any application that reads and writes data from the input-output system and waits for data from it. If tasks wait too much from external resources, they are perfect candidates for threading. Examples of these tasks might be reading/writing files, network interactions, or user input.
- GUI applications: When the user is using Graphical User Interface (GUI), it must remain responsive (GUI, not the user) despite the tasks being performed in the background. This is achieved by threading in Python.
- Simulations and modeling: Python threading is typically used in simulations where several entities are acting independently.
Creating Threads in Python
Creating threads in Python is made simple by its threading module.
The syntax for doing that is given below. It involves three steps:
- Importing the threading module
- Creating a function
- Creating a new thread object
import threading

def function_name():
    # code here


t = threading.Thread(target=function_name)
Utilizing Functions in Python Threading
Functions play a crucial role in Python threading. As you already saw, when creating a new thread, we specify a function the thread will execute. The function includes the code that the thread will run.
So how do we utilize this function? It’s simple: just use the start() function.
Continuing the steps of the generic example above means you have to write this code:
t.start()Let’s now see how this syntax works in a real example.
Creating a Single Thread in Python
Creating a single thread in Python is straightforward. We basically already covered that in the previous section. Now, let’s see how the syntax works when creating useful single threads in Python.
Practical Examples
Example 1: Creating a Single Thread
This is the simplest possible example of how the Python threading logic works.
import threading

def hello_world():
    print("Hello, world!")

t = threading.Thread(target=hello_world)
t.start()
We define the function hello_world and print the message. Then we create a thread t, whose target function is hello_world.
In the end, we use the start() method to run the thread.
Here’s the output.


Example 2: Background Task
Here’s a more complex example. It demonstrates the background task. This can be considered a single-thread example since we define only one thread.
However, depending on the complexity of the tasks, this can also be considered a multithreading example because the time-consuming task will be split up by the threading module.
import threading
import time

def worker():
    print("Thread execution starts")
    time.sleep(2)  # This simulates a time-consuming task
    print("Thread execution ends")

# create a thread by specifying the target function
t = threading.Thread(target=worker)

# start the thread
t.start()

print("Main thread execution ends")
We import the necessary modules. You know what the Python threading module is for. We use the time module to introduce a delay in the execution.
We then define the function worker that we want our thread to execute. This function simply prints a message, waits for 2 seconds (simulating a time-consuming task), and then prints another message. The waiting time is determined by the sleep() function.
Now comes creating a new Thread object, t. We pass the worker function as the target argument to the Thread constructor. This tells the thread to execute the worker function when it starts.
We start the thread by using the start() function. Python begins executing the worker function in the new thread. Note that calling start() doesn't mean the thread will immediately execute. It's up to the operating system's scheduler to determine when the thread will actually start running.
Finally, we print a message from the main thread indicating that the main thread execution has ended.
Here’s what the code outputs.


Working with Multiple Threads in Python
Working with multiple threads in Python involves creating several threads and executing them concurrently.
It is not much different than working with a single thread. Actually, the process is the same, only there is more of the same.
You define at least two functions and then create at least two thread instances. Finally, you call the functions from the threads using the start() function and do that at least two times.
Here’s the syntax that shows these steps.
import threading

def function_name1():
    # code here

def function_name2():
    # code here


t1 = threading.Thread(target=function_name1)
t2 = threading.Thread(target=function_name2)

t1.start()
t2.start()
Let’s now see how this works in practice.
Example 1: Monitoring the System CPU
Let's say we want to monitor the system's CPU and memory usage every 5 seconds, and we want to do this concurrently. We can use Python's built-in psutil library to get system information and threading to run the monitoring tasks concurrently.
Here’s the code.
import threading
import psutil
import time

def print_cpu_usage():
    while True:
        cpu_usage = psutil.cpu_percent(interval=1)
        print(f"CPU Usage: {cpu_usage}%")
        time.sleep(5)

def print_memory_usage():
    while True:
        memory_usage = psutil.virtual_memory().percent
        print(f"Memory Usage: {memory_usage}%")
        time.sleep(5)

# Create threads
t1 = threading.Thread(target=print_cpu_usage)
t2 = threading.Thread(target=print_memory_usage)

# Start threads
t1.start()
t2.start()
The print_cpu_usage and print_memory_usage functions are defined. Both functions run indefinitely due to their while loops.
The print_cpu_usage function retrieves the CPU usage every second using psutil.cpu_percent(interval=1) and prints it. Then, it sleeps for 5 seconds before repeating the process.
The print_memory_usage function retrieves the system's memory usage using psutil.virtual_memory().percent and prints it. It, too, sleeps for 5 seconds before repeating the process.
Now, we create threads t1 and t2. The target function for t1 is print_cpu_usage, and for t2, it's print_memory_usage.
It’s time to execute the threads. We do that by calling the start() method on both thread objects.
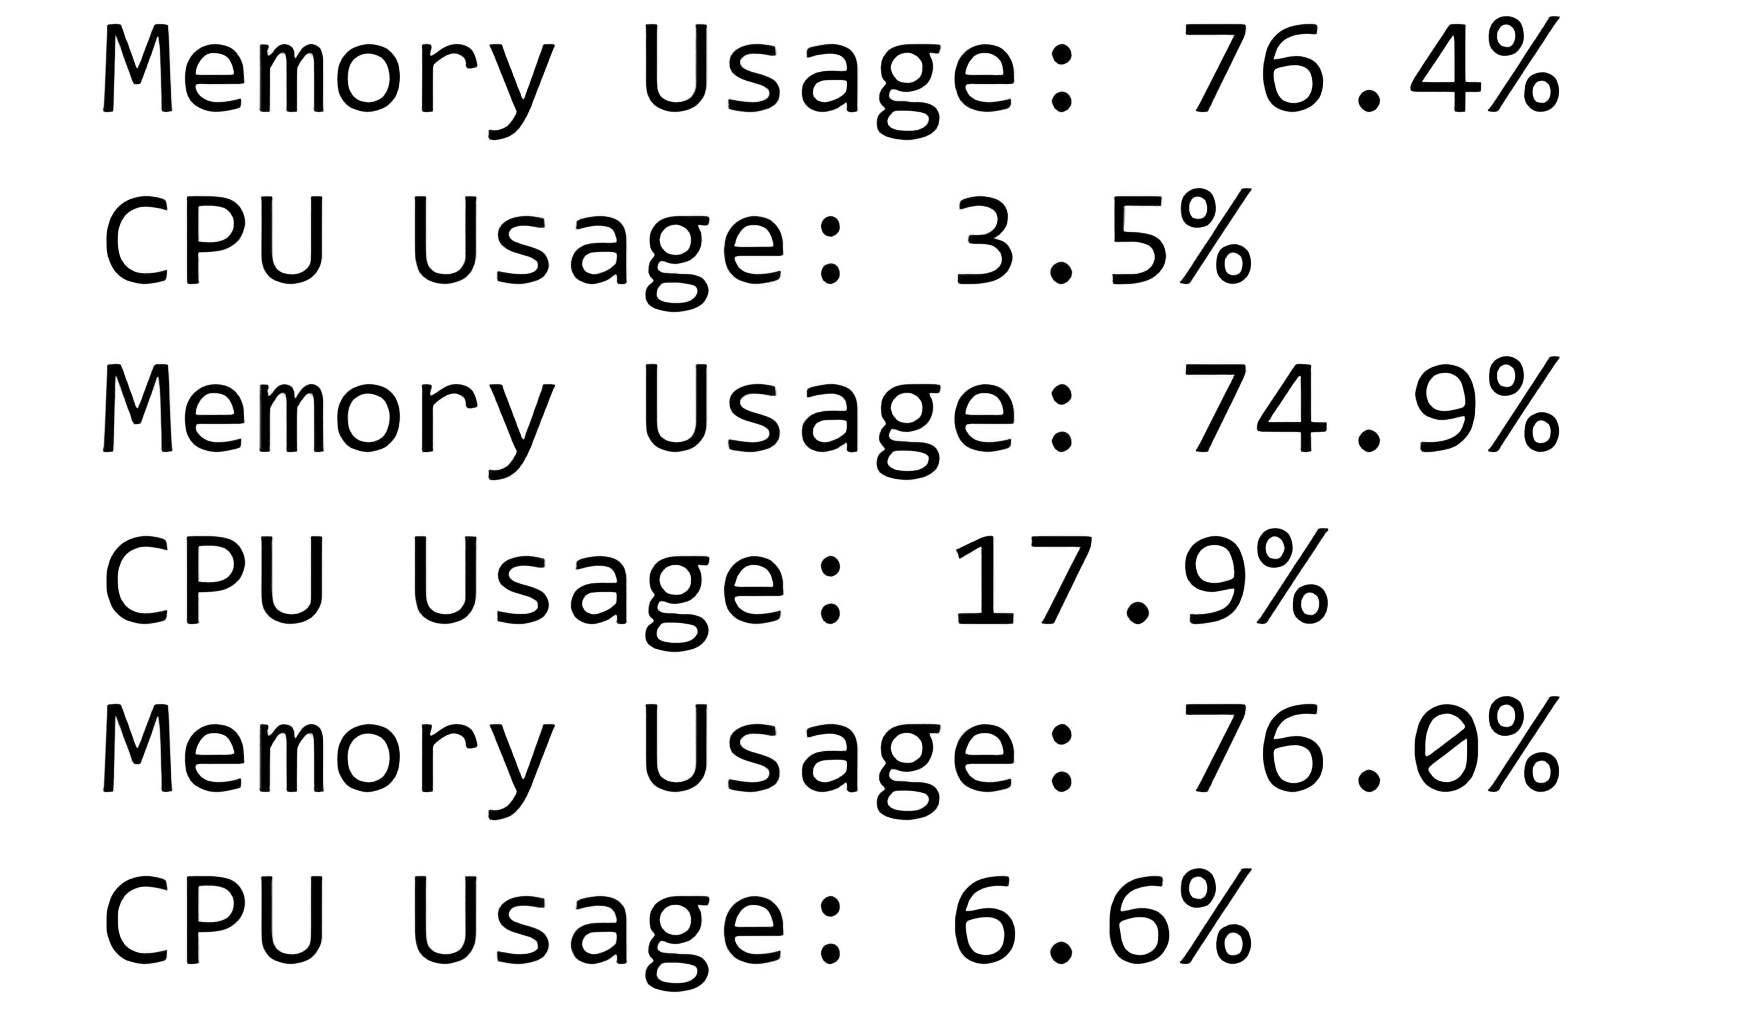
The result of this code is two threads running concurrently, each repeatedly printing the current CPU usage and memory usage of the system every 5 seconds. Because these tasks are running in separate threads, they can operate independently and concurrently without blocking each other.
You can see the output below.

Example 2: Web Scraper
It’s not necessary that the two threads have two different target functions. You can also assign one function to multiple threads. This becomes easy when you use the for loop. Utilizing the loop also makes it possible to start multiple threads with only one start() method.
The below code shows you a web scraper that does exactly that.
import threading
import requests

def download_file(url, filename):
    response = requests.get(url)
    with open(filename, 'wb') as file:
        file.write(response.content)
        print(f"{filename} downloaded")

# URLs of two files to be downloaded
urls = ["https://data.ny.gov/api/views/d6yy-54nr/rows.csv?accessType=DOWNLOAD", "https://data.wa.gov/api/views/f6w7-q2d2/rows.csv?accessType=DOWNLOAD"]
filenames = ["Lottery_Powerball_Winning_Numbers__Beginning_2010.csv", "Electric_Vehicle_Population_Data.csv"]

# create and start two threads
for i in range(2):
    t = threading.Thread(target=download_file, args=(urls[i], filenames[i]))
    t.start()
The only function we define is download_file. This function takes two arguments, url and filename. The function fetches the files from the provided URLs using the requests.get() method and saves it with the given filename.
The file is written in binary mode ('wb'), which is required for non-text files like images, executables, etc. It can also be used for text files without any problems. After the file is downloaded and saved, a message is printed to the console indicating the download is complete.
We now define lists of URLs and filenames. The urls list contains the URLs of two CSV files to download. We use the files from data.gov. The filenames list contains the corresponding filenames to save the downloaded files under.
Then, we create and start threads. A for loop is used to create and start a new thread for each URL/filename pair. The threading.Thread() function creates a new thread, with the target parameter specifying the function to run in the new thread (in this case, download_file). The args parameter is a tuple specifying the arguments to pass to the target function. The start() method then starts the newly created thread, which begins its execution. This results in the files being downloaded concurrently rather than one at a time.


Example 3: Downloading a File From the Internet
Here’s one interesting example where we’ll have only one thread, but this can be considered multithreading.
In this example, a thread is used to perform an I/O-bound task. More specifically, we’re downloading a file from the internet. In this case, it will be a ‘Better Call Saul’ Wikipedia article.
If we download only one file, like in our example, it’s a single thread. But if there are multiple files to be downloaded, this becomes a multi-threading example.
import threading
import requests

def download_file():
    print("Starting file download...")
    response = requests.get('https://en.wikipedia.org/wiki/Better_Call_Saul')
    with open('F:\BetterCallSaul.json', 'wb') as f:
        f.write(response.content)
    print("File downloaded.")

print("Starting file download in a thread...")
# Start the download in a new thread.
thread = threading.Thread(target=download_file)
thread.start()

# The main thread continues.
print("The main thread continues while the file is being downloaded.")
time.sleep(2)
print("Main thread completed.")
We define the download_file function. It prints a message to the console indicating that the file download is starting.
Then we use the get request to the specified URL and store the server's response in the response variable. After that, the function opens a file in write-binary mode at the specified path (here, it's 'F:\BetterCallSaul.json'). If the file does not exist, it is created. The file is referred to as f within the block.
We use the write() function to write the content of the server's response to the file. The content is retrieved from the response object using the content attribute, and we print a message that the file was downloaded.
Next, we again use the print() function to print a message and create a new thread object that will execute the download_file function when started.
After that, there’s the start() function that starts the thread, which begins executing the download_file function.
The remaining lines of the code represent operations happening in the main thread while the file is being downloaded by the separate thread. The sleep() function makes the main thread wait for 2 seconds.
Here’s the code output. And, trust me, the downloaded file really is on my F: disc.


How to Stop a Thread in Python


We learned how to create and run threads in Python. It seems logical it’s also possible to stop the thread once it starts.
In Python, threads are not directly stoppable. If you think there’s some kind of Thread.stop() method that can stop a thread's execution, we’ll have to disappoint you; there isn’t.
This is largely because abruptly stopping a thread is a bad idea. Why? The thread could be holding resources, e.g., file handles or database connections. Force-stopping the thread without properly releasing these resources can lead to various problems.
However, there are a few techniques available to stop a thread effectively:
- using a flag
- using a join with timeout
- using daemon threads
Using a Flag to Stop the Thread in Python
Using a flag to signal the thread to stop executing involves periodically checking the flag within the thread's target function and returning from the function if the flag is set:
The approach is shown below.
import threading

class StoppableThread(threading.Thread):
    def __init__(self):
        super().__init__()
        self._stop_event = threading.Event()

    def stop(self):
        self._stop_event.set()

    def run(self):
        while not self._stop_event.is_set():
            # Your code here
            pass
In this code, an Event object is used as the flag. The stop method sets the flag, and the run method checks the flag in each iteration of its loop.
Example: Monitoring the Disk Usage of the System
Threading here is used to monitor the disk usage of the system. If the disk usage crosses a certain threshold, it will print a warning message. This monitoring will continue until the thread is stopped using the stop method.
import threading
import os
import time
import shutil

class DiskMonitorThread(threading.Thread):
    def __init__(self, threshold=80):
        super().__init__()
        self._stop_event = threading.Event()
        self.threshold = threshold

    def stop(self):
        self._stop_event.set()

    def run(self):
        while not self._stop_event.is_set():
            total, used, free = shutil.disk_usage("/")
            # Calculate percentage of used disk space
            used_percent = (used / total) * 100
            if used_percent > self.threshold:
                print(f"WARNING: Disk usage has crossed {self.threshold}%!")
            time.sleep(10)  # Check every 10 seconds

# Usage
monitor = DiskMonitorThread(threshold=50)  # Let's set the warning threshold to 50% for testing purposes
monitor.start()

try:
    # Let the monitoring continue for 1 minute (as an example) before stopping the thread.
    time.sleep(60)
finally:
    monitor.stop()
    monitor.join()

print("Disk monitoring stopped.")
Apart from already familiar Python modules, we also import shutil. It contains the disk_usage method we’ll use to get the disk space information.
We create the class DiskMonitorThread which inherits from threading.Thread, which means it represents a separate thread of execution in the program.
Then we initialize the thread. The __init__ method is the constructor for the class. We set the default threshold for disk usage warning to 80%. We create an event object which can be set and checked (used to stop the thread gracefully) by: self._stop_event = threading.Event().
The stop method sets the _stop_event. This will signal the thread to stop its operation.
The run method is what the thread executes when it starts. Every 10 seconds, it continually checks the disk usage using the disk_usage() method. If the disk usage exceeds the specified threshold, it prints a warning message. The loop will continue until _stop_event is set, meaning the thread will keep monitoring until it's explicitly stopped.
Then we create an instance of the DiskMonitorThread with a threshold of 50% and starts it.
We allow for the thread to run for 60 seconds. After 60 seconds, regardless of any exceptions or errors, the finally block will execute, stopping the thread using the stop() method and then waiting for the thread to finish with monitor.join(). With this, we also use another method for stopping the thread: join(). We’ll cover it in the next section.
But let’s first have a look at the output of our code here.


Using a Join With Timeout to Stop the Thread in Python
You can use the join() method with a timeout to stop waiting for a thread after a certain amount of time. This doesn't actually stop the thread's execution; it just allows the main thread (or the thread that called join) to continue executing:
The generic code for using this method is here.
t = threading.Thread(target=some_function)
t.start()
t.join(timeout=1.0)
It makes the main thread to stop waiting for t and continue executing after 1.0 seconds.
Example: Simulating Data Downloading
We’ll create a simple threaded program that simulates downloading some data over a period of time.
import threading
import time

def download_data():
    """Simulate downloading data."""
    print("Starting data download...")
    for i in range(1, 6):  # Simulate a 5-step download
        print(f"Downloading {i * 20}%")
        time.sleep(0.5)  # Simulate time taken to download each part
    print("Download completed!")

# Create a thread to handle the data download
t = threading.Thread(target=download_data)

# Start the download thread
t.start()

# We'll join with a timeout, meaning we'll wait for the thread to finish for up to 1 second.
# Since the download will take 2.5 seconds, our main thread will move on after the timeout.
t.join(timeout=1.0)

print("Main thread continues its work (perhaps some unrelated task).")
The download_data function simulates a downloading process. In it, a message indicating the start of the download is printed. A for loop simulates the download in 5 steps. With each iteration, it prints a message indicating the percentage downloaded and then sleeps for 0.5 seconds to simulate the time taken to download that part. After all iterations are completed, the message is printed.
We create a thread object t with download_data as its target function. Then, we use the start() method to run the target function in a separate thread.
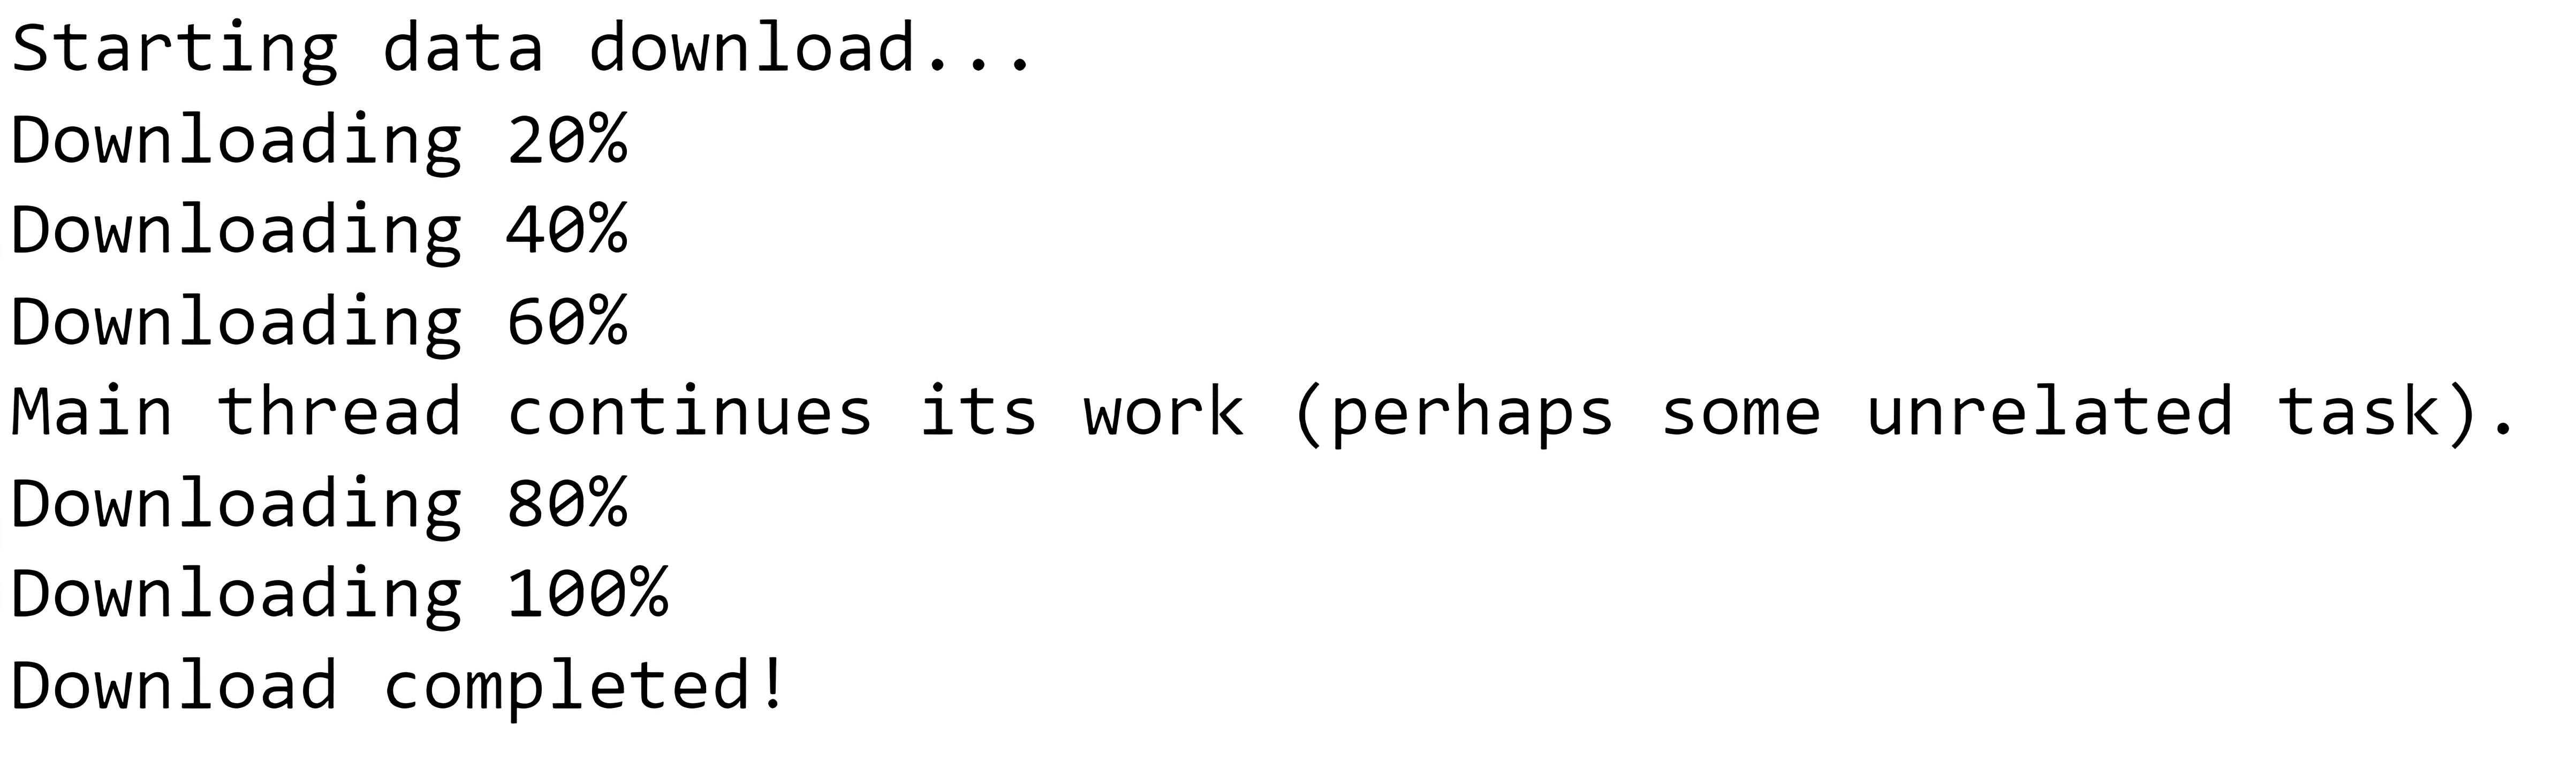
Now comes stopping the Python thread. The join() method makes the main thread wait for the t thread to complete its execution, but only up to 1 second, which is defined in the timeout parameter. If the thread t hasn't finished within this time, the main thread will stop waiting and continue its execution. In this case, since our simulated download takes 2.5 seconds in total, the main thread will move on after 1 second of waiting.
After the join or timeout, the main thread will print a message we specified.

Using Daemon Threads to Stop the Thread
A daemon thread is a thread that doesn’t prevent the program from exiting. If the program ends or all non-daemon threads finish execution, any remaining daemon threads are stopped.
Here’s the generic approach.
t = threading.Thread(target=some_function)
t.setDaemon(True)
t.start()
In this code, t is a daemon thread. If the rest of the program finishes while t is still running, t will be stopped.
Example: Server That Monitors Incoming Connections
Here’s an example that uses a simulated server status function.
import threading
import time
def server_status():
"""Simulated function to print server status every 2 seconds."""
while True:
# This will print indefinitely until the main program exits
print("[Server Status]: Running")
time.sleep(2)
# Initialize the thread with the server_status function as its target
t = threading.Thread(target=server_status)
# Setting the thread as a daemon means it will automatically exit when the main program does
t.daemon = True
# Start the server status thread
t.start()
def run_server():
"""Simulated function for server main loop."""
for _ in range(10):
# Simulate the server doing some work
print("[Server]: Processing data...")
time.sleep(1)
run_server() # Run the main server function
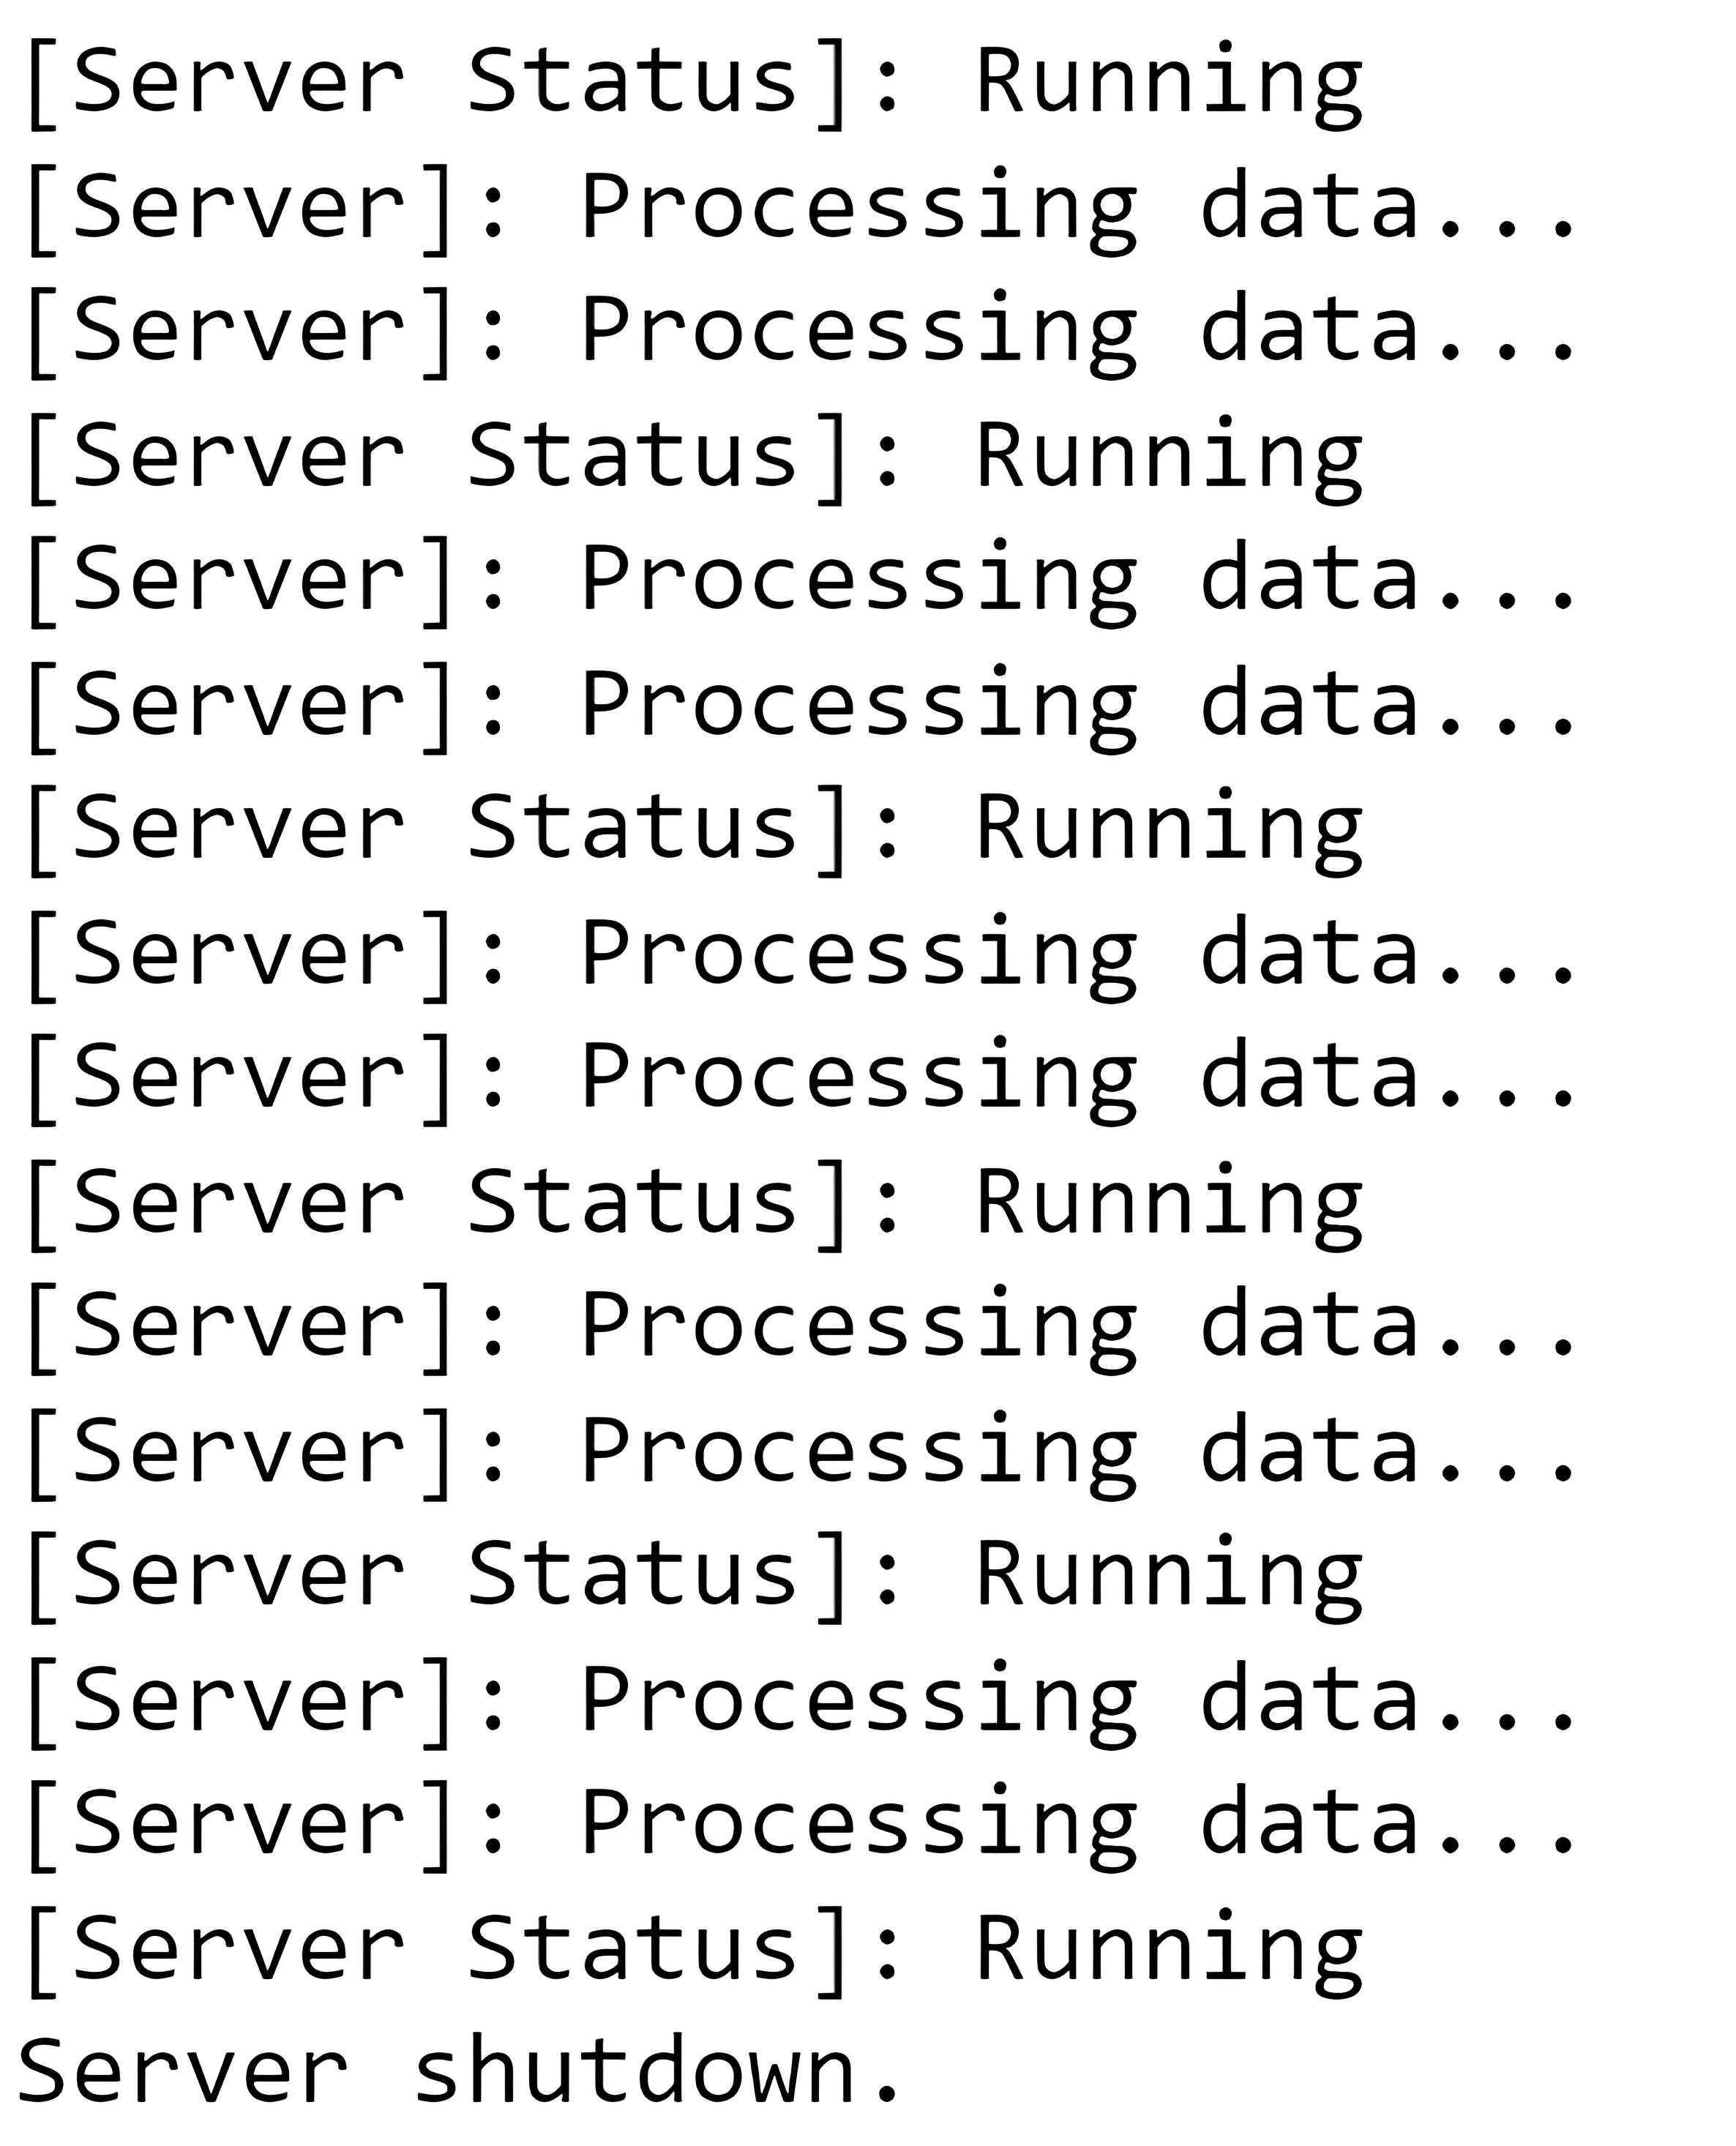
print("Server shutdown.")The server_status function simulates a background task that constantly prints the server status. It runs indefinitely because of the while True loop. Every two seconds, it prints the server's status.
Then, we create a new thread, t, whose target function is server_status.
By setting t.daemon = True, the t thread is marked as a daemon. Daemon threads are background threads that automatically exit as soon as all non-daemon threads (typically the main program) have completed. This means that when the main server function (run_server) completes, the daemon thread (t) will automatically stop, and you won't have to manually stop it. We then use the start() method to start this thread.
The run_server function simulates the main work of the server. It "processes data" ten times, with a delay of 1 second between each iteration. This simulates the server's main functionality.
After this function completes, the program prints "Server shutdown." to indicate the end of the server's operation. Since the daemon thread will automatically stop when the main program completes, there's no need to manually stop or join the background thread.
Here’s the output.

Exploring Python Threading Tools
We’ve been using Python’s threading module in our examples so far. This is now a good place to take a look at its commonly used tools and some other modules for threading.
Python Threading Module
Python's threading module provides some tools that can help you manage and coordinate threads.
Lock: This is a synchronization tool, and it’s the simplest one in Python. It ensures that only one thread executes a particular part of code at a time. When a thread acquires a Lock, no other thread can acquire it until the original thread releases it.
Event: This is another synchronization tool. Event allows one thread to signal one or more other threads that a particular event has occurred.
Condition: This is a more complex synchronization tool that allows one thread to wait for a particular condition to be met while other threads can signal that the condition has been met. Here’s how it’s explained in the official Python documentation.
Semaphore: Semaphore is a synchronization tool that controls access to a common resource by multiple processes in a concurrent system and helps in avoiding the critical section problem.
Python Asyncio Library
Asyncio is a library introduced in Python 3.3. It is used for writing single-threaded concurrent code using coroutines, multiplexing I/O access over sockets and other resources, running network clients and servers, and other related primitives.
Here are some of its beneficial features.
Coroutines: These are special functions that can give up control to their caller without losing their state. Coroutines are prefixed with the async keyword. They can use the await keyword to call other coroutines.
Event Loop: At the core of every asyncio application is the event loop. It schedules asynchronous tasks and callbacks, handles I/O, and manages subprocesses.
Tasks: These are a type of coroutine that can run concurrently with other tasks. Tasks are equivalent to threads but without the need for traditional synchronization tools.
Python concurrent.futures Library
The concurrent.futures library is not directly related to Python threading but to concurrency. It provides a high-level interface for asynchronously executing functions using threads or processes. The two primary classes of interest are ThreadPoolExecutor and ProcessPoolExecutor.
ThreadPoolExecutor: This executor class is used for parallelizing the execution of tasks using threads. It is suitable for I/O-bound tasks since threads in Python, especially with the standard CPython interpreter, are hampered by the Global Interpreter Lock (GIL) when it comes to CPU-bound tasks.
ProcessPoolExecutor: This executor class uses processes to parallelize the execution of tasks. It is particularly suitable for CPU-bound tasks because each process runs in its own Python interpreter with its own independent GIL. This allows you to truly exploit multiple CPU cores, bypassing the GIL limitation.
Its features are:
- Automatic distribution of tasks across multiple processes.
- Takes care of process creation, management, and result collection.
- Suitable for CPU-intensive tasks, as it bypasses the GIL.
The key differences between ThreadPoolExecutor and ProcessPoolExecutor are:
1. Concurrency Model: ThreadPoolExecutor uses threads (lightweight, same memory space) while ProcessPoolExecutor uses processes (heavier, separate memory space).
2. Use Case:
- ThreadPoolExecutor is typically used for I/O-bound tasks where you spend more time waiting for something (like network or disk operations) than doing CPU-intensive computations.
- ProcessPoolExecutor is best suited for CPU-bound tasks that require significant computation.
3. Memory: Threads in a ThreadPoolExecutor share the same memory space. This makes it easy for them to share data but also makes them susceptible to race conditions. Meanwhile, each process in a ProcessPoolExecutor has its own memory space. Sharing data between processes is slower because it requires serialization and inter-process communication.
4. GIL (Global Interpreter Lock): This is a mutex in CPython that ensures only one thread can execute Python bytecode at a time. ThreadPoolExecutor is affected by the GIL, making it less suitable for CPU-bound tasks in CPython. ProcessPoolExecutor, using separate processes, bypasses the GIL entirely.
5. Overhead: Threads have a lower overhead compared to processes. Starting a process is slower and requires more resources. However, the isolation of processes can be beneficial for stability and data security
Other Python Libraries
Apart from the three mentioned above, there are also some other Python libraries you may find useful when dealing with threading.
greenlet and gevent: Third-party libraries that provide lightweight, "green" threading via coroutines. They don't offer true parallel execution – this is similar to asyncio – but can achieve high levels of concurrency. Here’s the official documentation for greenlet and gevent.
Twisted: This is an older, event-driven network programming framework that's been used to build many networked apps. Twisted is not as user-friendly as asyncio, but you might like its robustness.
Quart and FastAPI: These are modern asynchronous web frameworks that allow for handling large numbers of simultaneous connections, useful in building scalable web APIs.
To sum up, traditional threading (like the threading module) is about multiple threads of execution and is subject to the Global Interpreter Lock (GIL) in CPython, which means only one thread executes Python bytecode at a time. However, I/O-bound tasks can benefit from this model.
On the other hand, asyncio, greenlet, gevent, and similar tools use an asynchronous, event-driven model where context switches are made in user-space (cooperative multitasking). They excel in scenarios with high I/O wait times, like many network operations.
Speaking of libraries, there are plenty more threading non-related libraries that data scientist should know. We talked about them already in the Python Libraries article.
Multithreading and Asynchronous Programming in Python
Understanding the distinctions between threading and asynchronous programming can provide you with the flexibility to choose the right tool for the job.
As previously mentioned, Python's threading module allows for concurrent programming. But due to Python's Global Interpreter Lock (GIL), threads are limited to running on a single processor core. This means that while threads can be useful for I/O-bound tasks, they don't provide true parallelism for CPU-bound tasks.
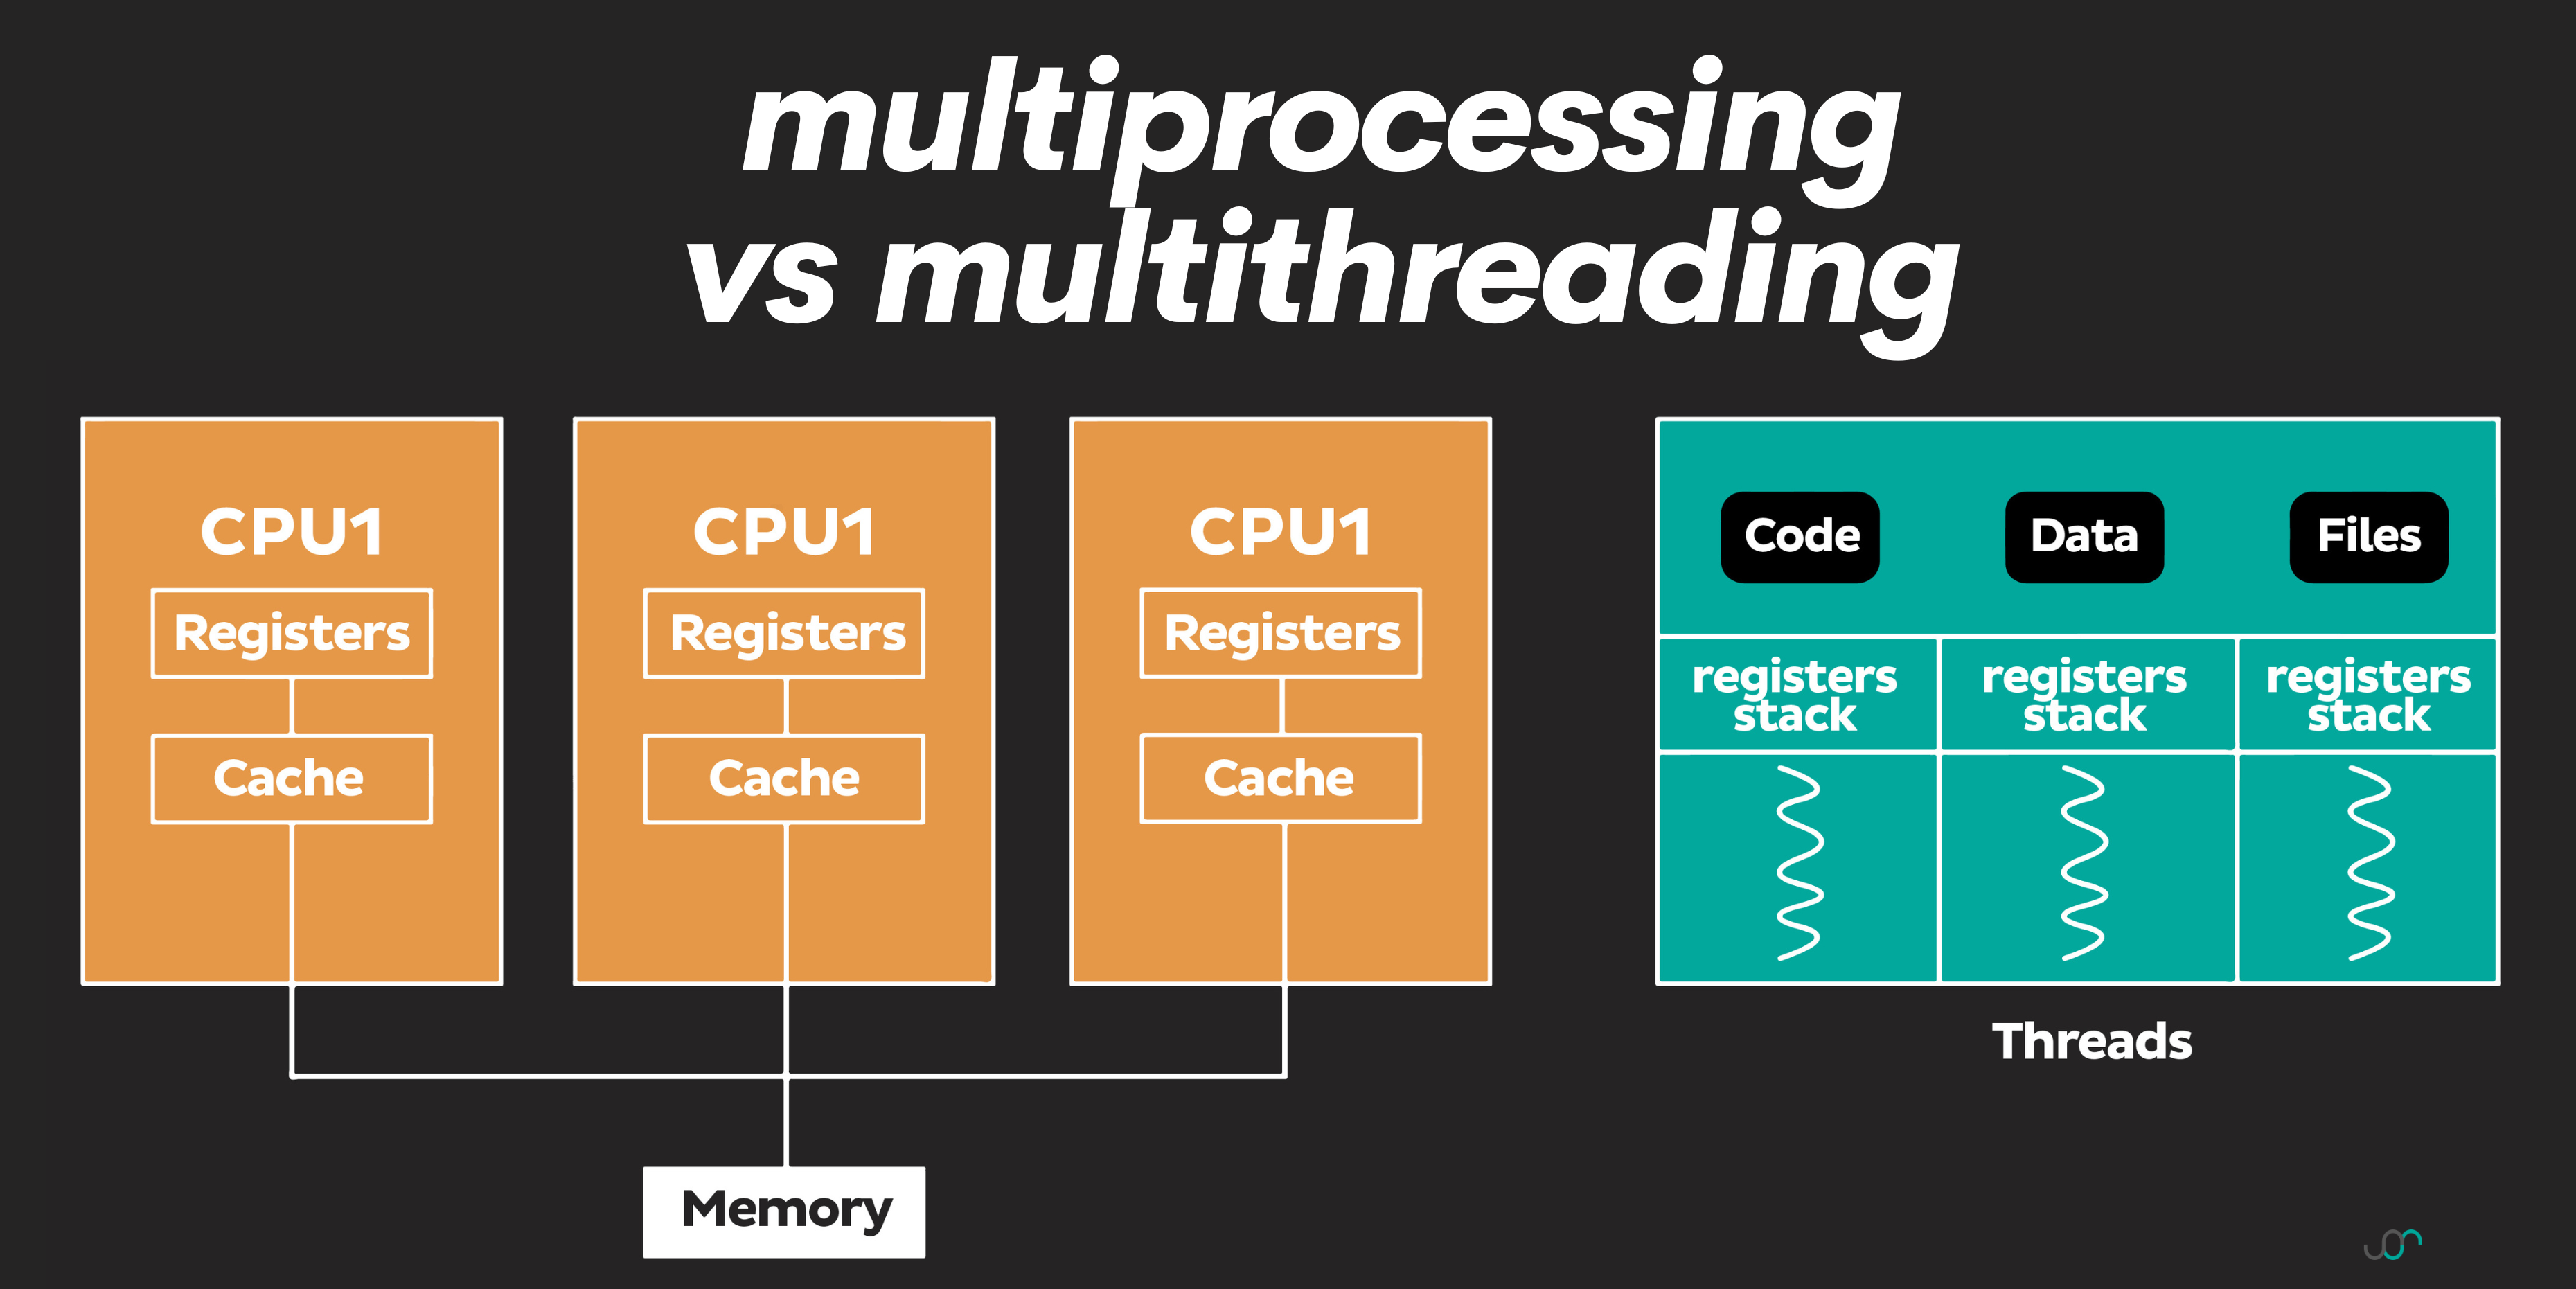
For real parallel computing, we could utilize Python's multiprocessing module, which allows the creation of multiple processes, each having its own Python interpreter and memory space. While this could lead to performance improvements for CPU-bound tasks, it also introduces additional complexity and resource usage.
We can visualize multiprocessing like this.

Multiprocessing can be synchronous and asynchronous. Asynchronous programming in Python, often associated with the asyncio library, is a different approach to concurrency. Asynchronous programming is single-threaded, but it uses non-blocking I/O operations and coroutines to perform multiple tasks concurrently without the need for threads.
Here’s the visualization of how synchronous and asynchronous multiprocessing works.

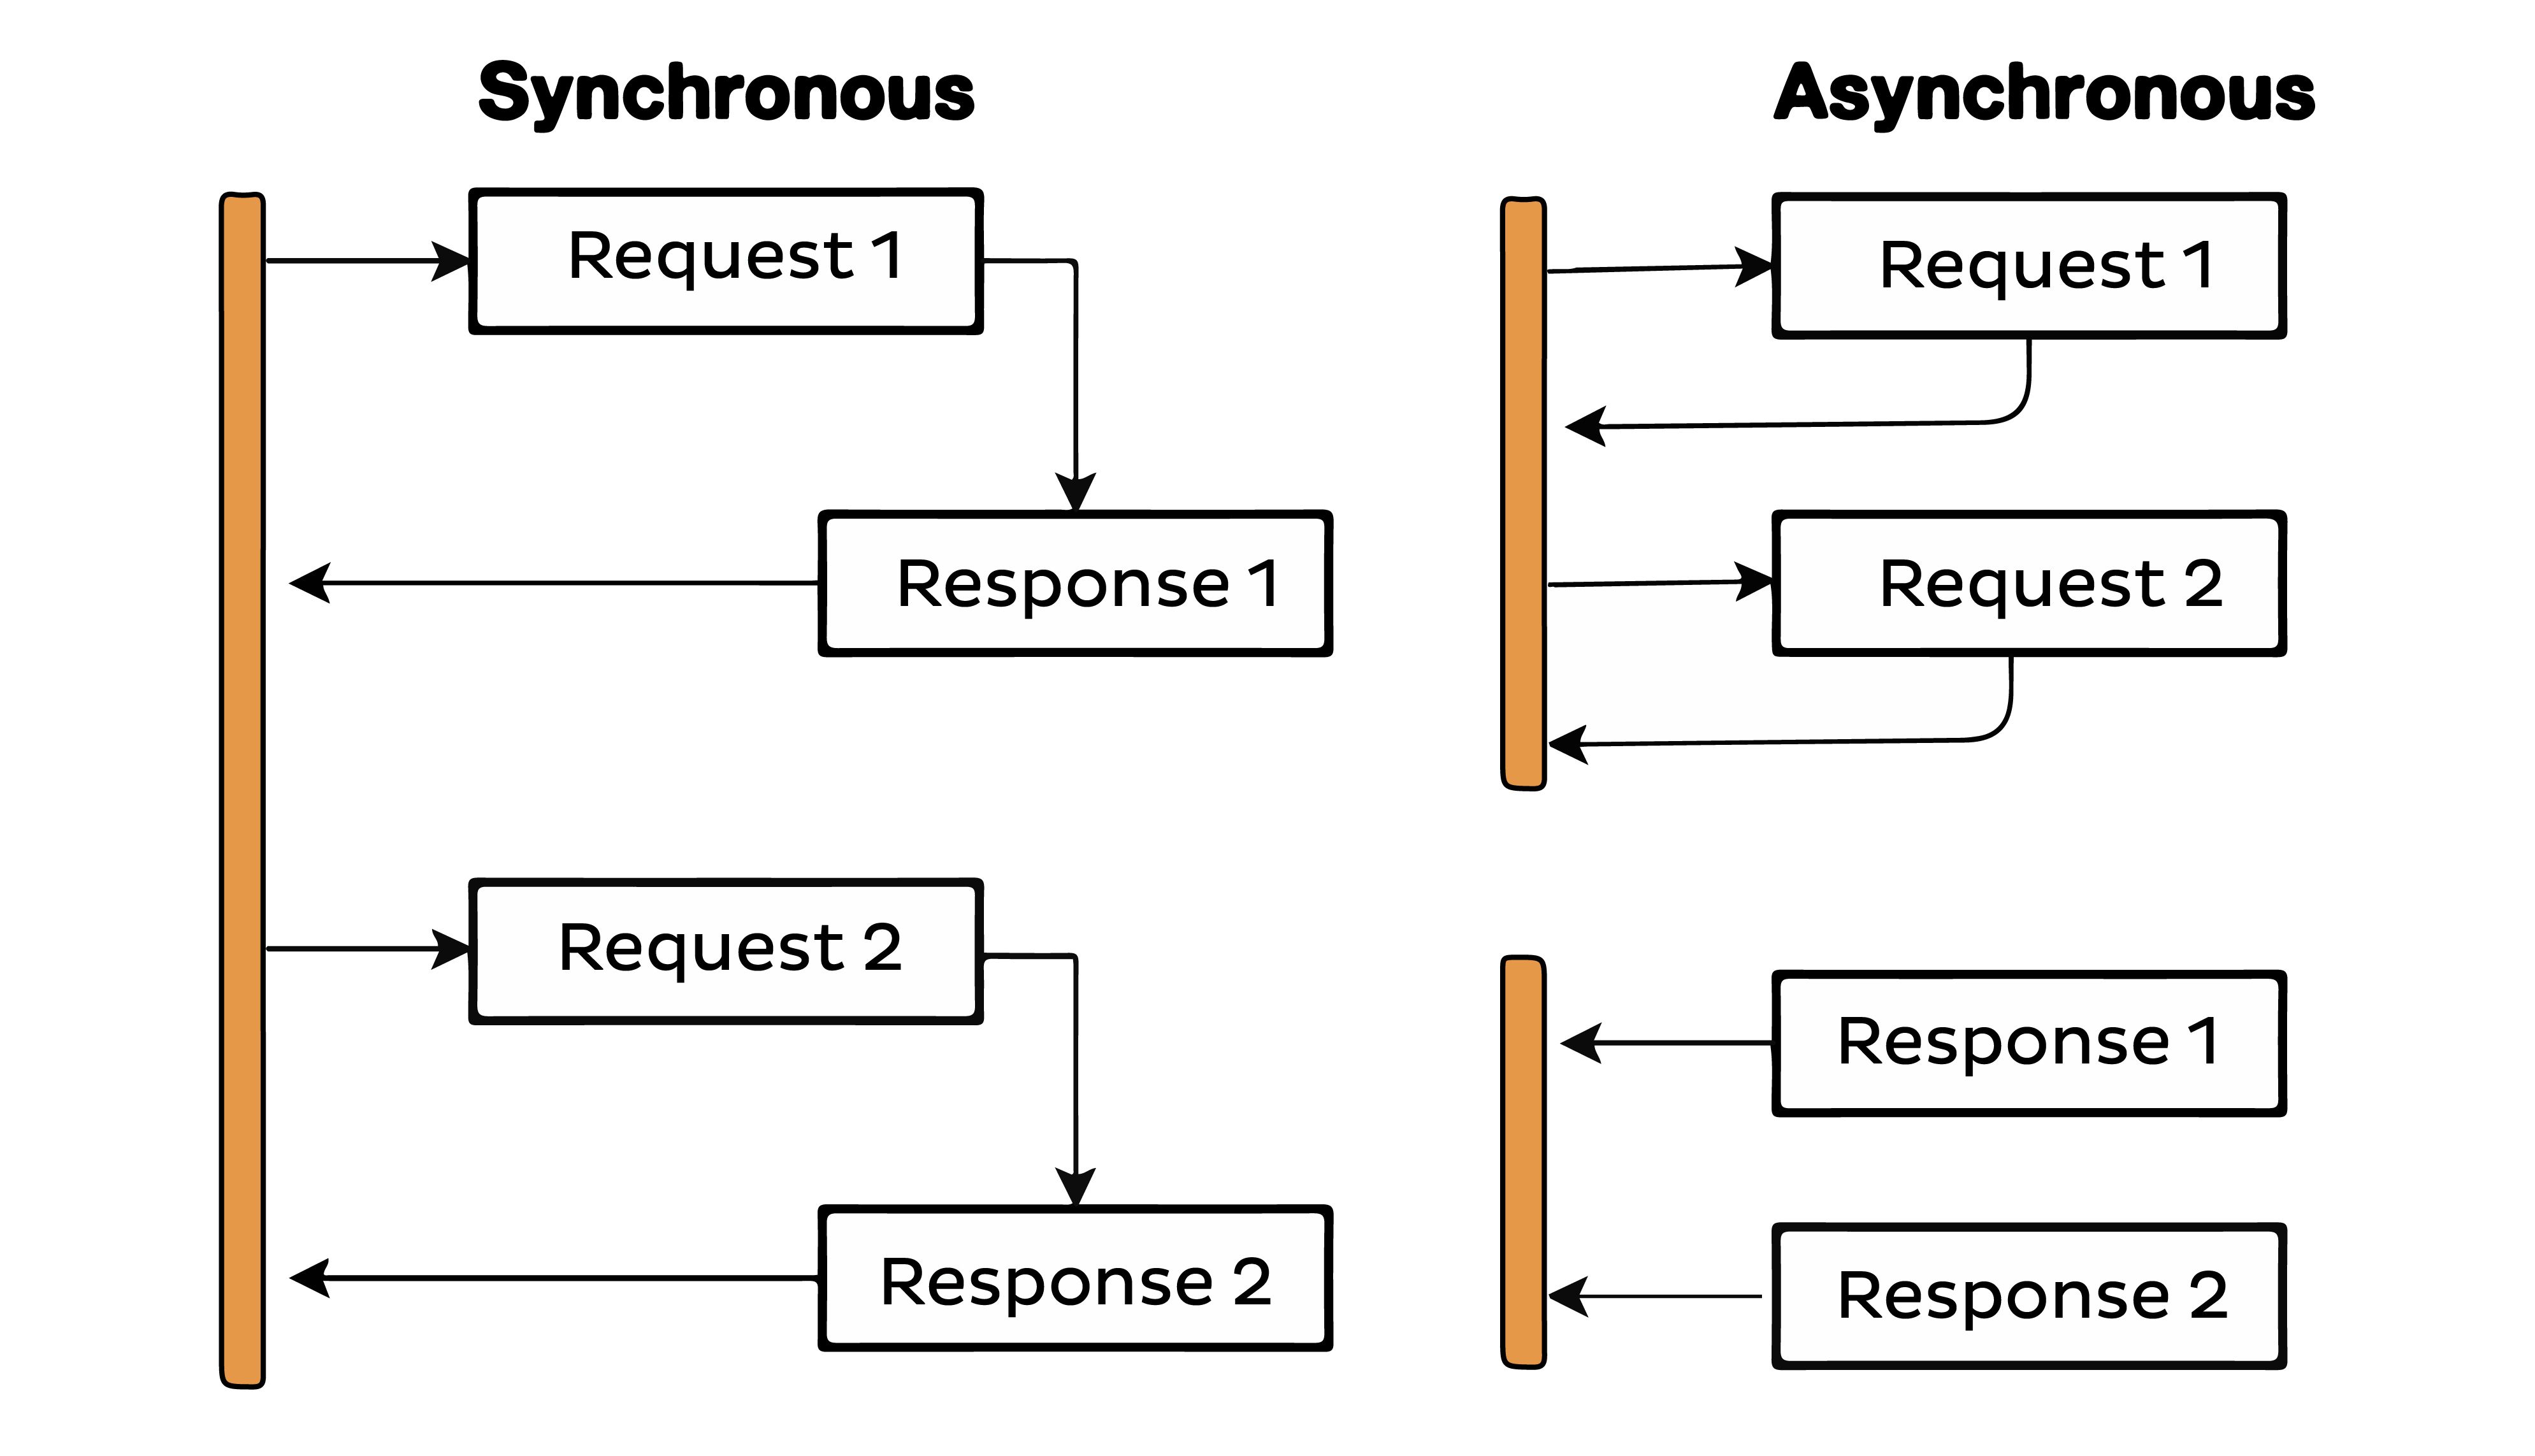
From the above image, the main difference is obvious. The synchronous tasks are executed in a sequence. One task starts only after the previous one has been completed. It waits for an operation to complete before moving on.
On the other hand, asynchronous tasks are executed out of sequence. They don't wait for one task to complete before moving on to the next one. An operation can be started, set aside, and another operation can be initiated.
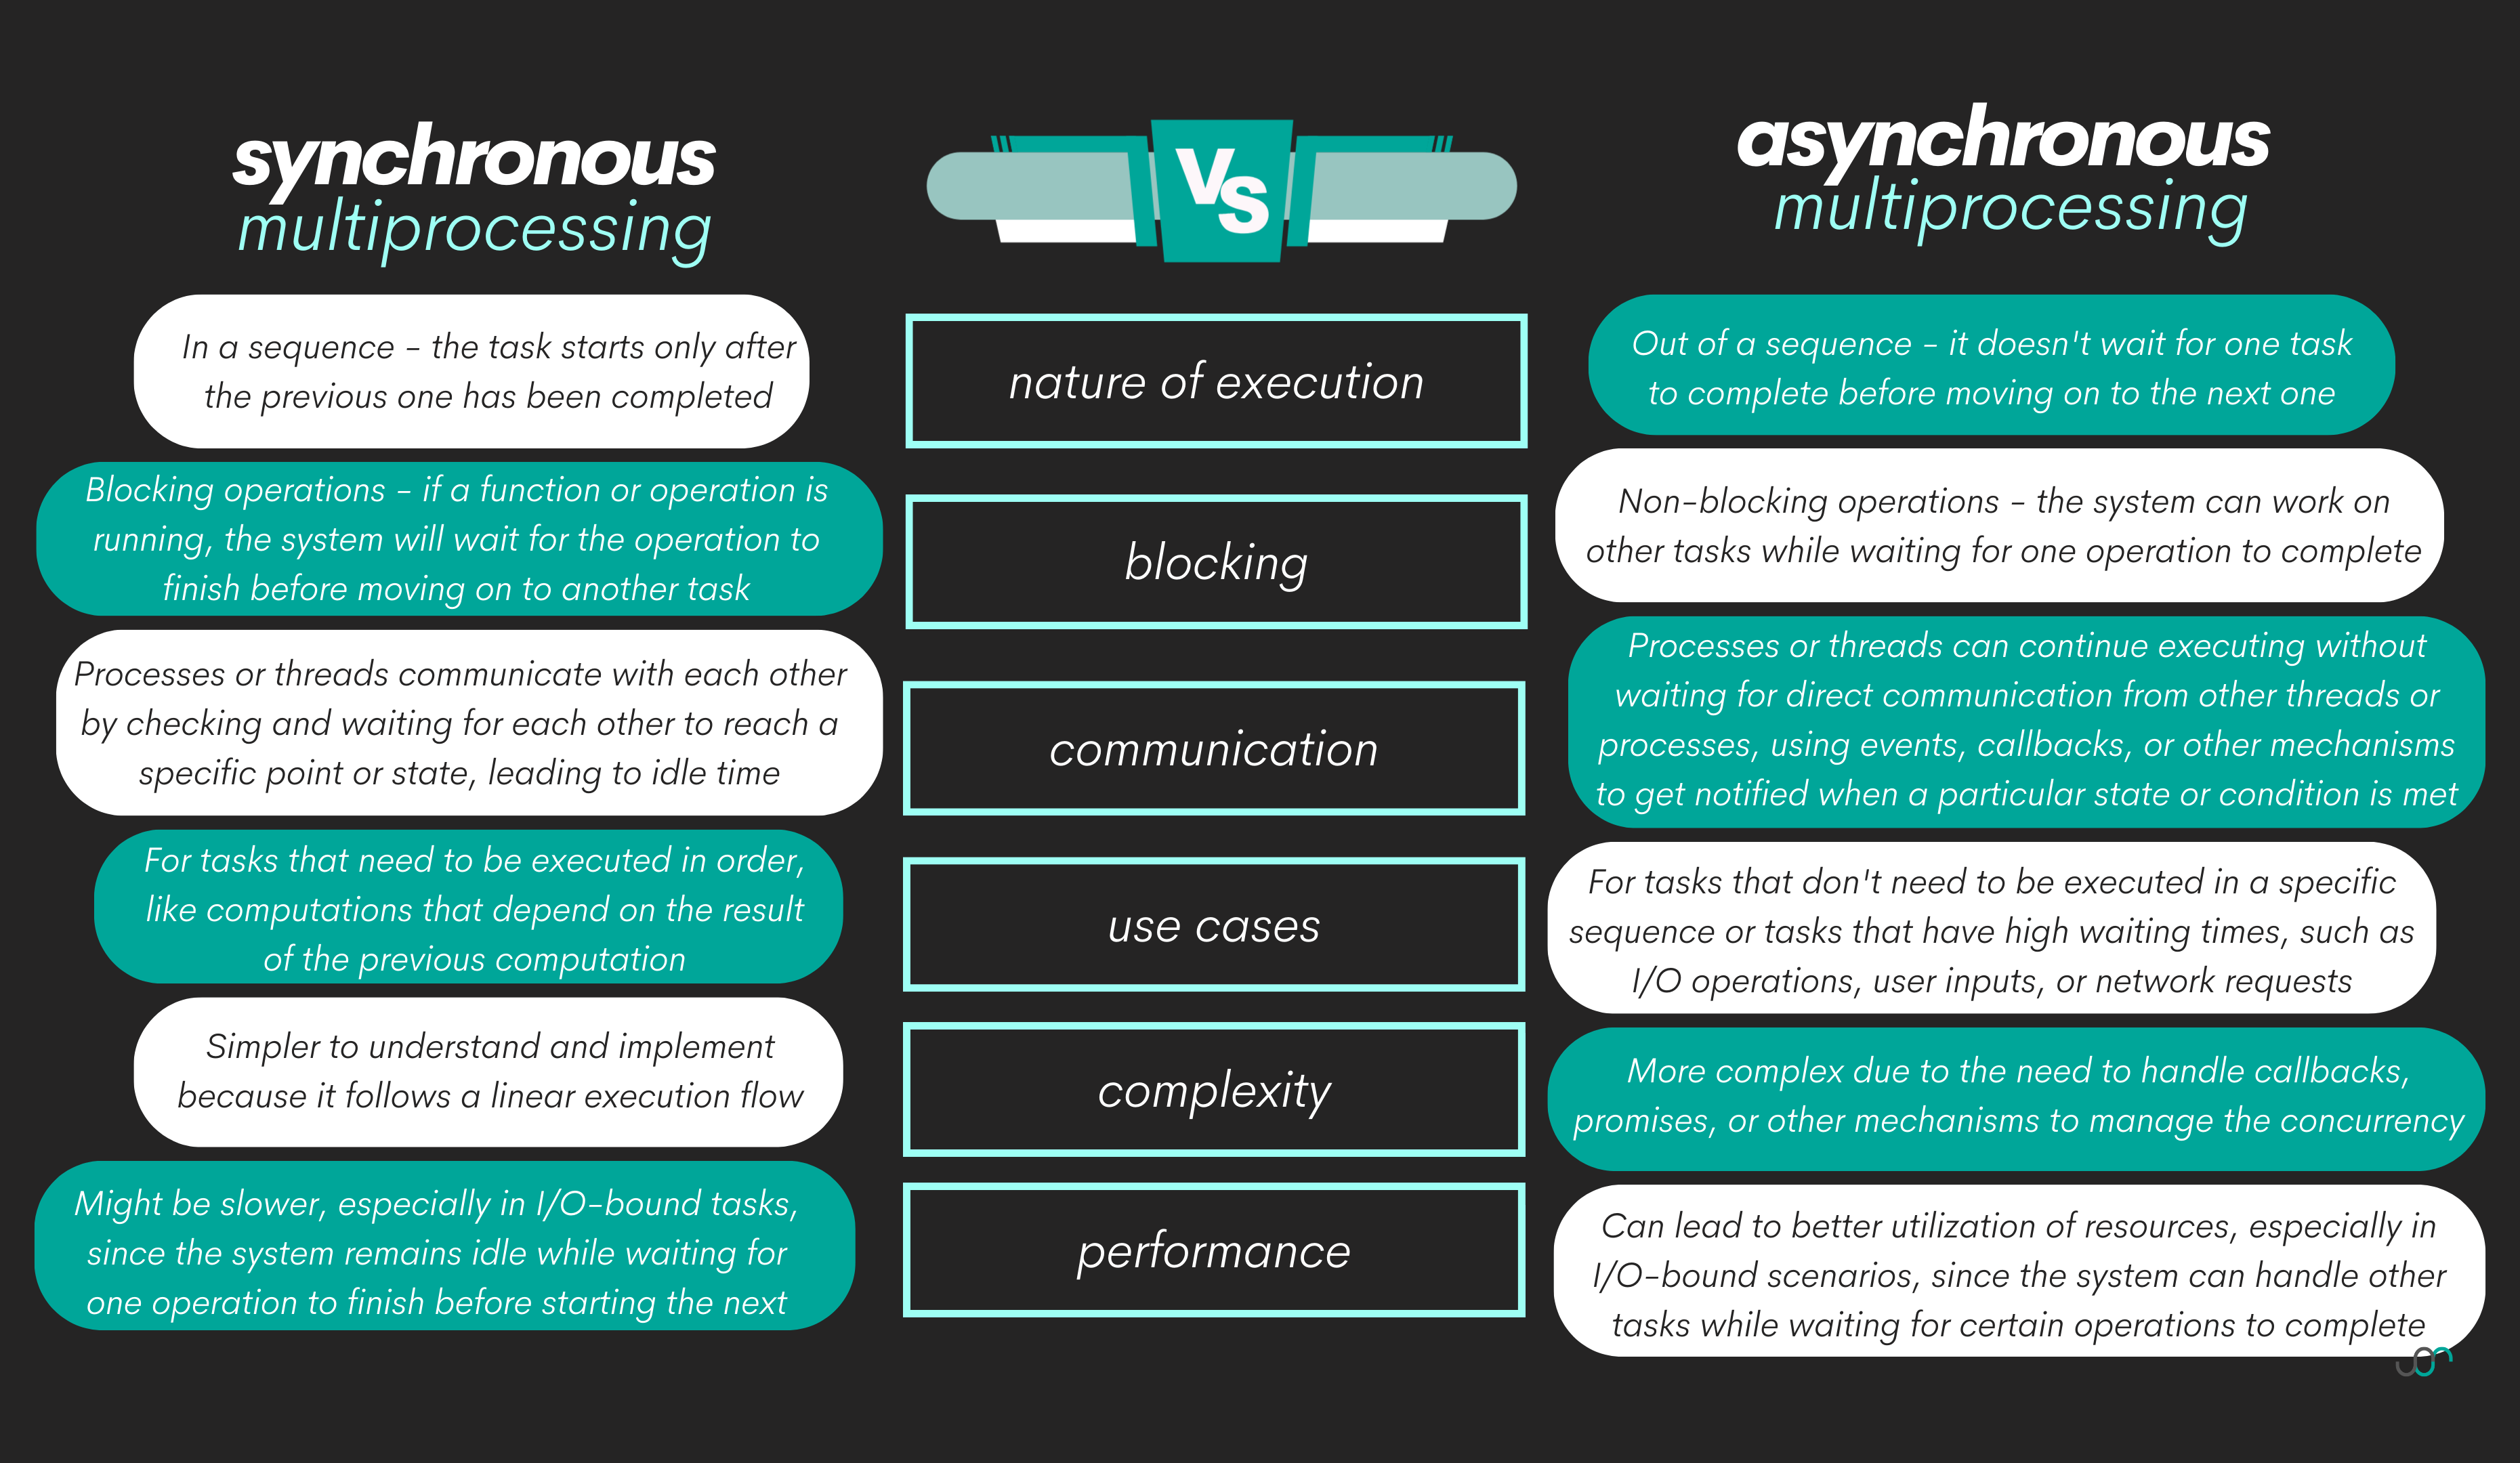
Here’s an overview of all the main differences between synchronous and asynchronous multiprocessing.

Best Practices for Managing Threads in Python
Despite Python's ease of use for threading, there are still some best practices we advise you to follow when working with threads.
Avoid sharing state: Try to keep data confined to individual threads as much as possible. A shared state can lead to complicated race conditions and bugs that are hard to track down.
Don't forget to join: If a program ends before a thread has completed its task, the thread will be killed, potentially leaving resources in an uncertain state. Always use join() to ensure all threads have been completed before the program ends.
Use the appropriate synchronization tool: Different synchronization tools are appropriate for different situations. Use the simplest tool that fulfills your requirements.
Don't use too many threads: Each thread requires resources. Using too many threads can actually decrease performance due to the overhead of creating and destroying threads.
Test thoroughly: Threading bugs can be elusive and are often timing-dependent. Make sure to thoroughly test your threaded programs under various conditions.
In conclusion, Python's threading module is a powerful tool for adding concurrency to your programs. While it requires careful management and testing, it can greatly enhance the performance and responsiveness of your Python applications.
Conclusion
In this article, we talked about how you can use Python threading. We showed you how to create and use single and multiple threads in examples such as I/O bound, GUI applications, and simulations, and modeling.
We leveraged the threading Python module, but it’s not the only option for threading libraries in Python – there are also libraries such as asyncio, concurrent.futures, greenlet, gevent, Twisted, Quart, and Fast API.
Python threading is a complex topic, and we could go on and on about it. This article should give you a good start in exploring threading in Python. To use it properly, you need to have a solid knowledge of other Python programming concepts, which you can learn and practice in our coding questions. Some of the examples are given in the Python Interview Questions article.
Share