Mastering Python Class Methods: A Practical Guide
 Written by:
Nathan Rosidi
Explore the transformative power of Python class methods to streamline your data science projects with efficient and flexible coding practices.
"Code is like humor. When you have to explain it, it’s bad."
Let’s delve into another essential topic for those in Python who want to become more proficient in their coding methods, namely class methods.
I will explain precisely what makes class methods different from instance and static methods and help you understand the dire need to use them in data science.
Understanding Python Class Methods
For aspiring data scientists who learn more sophisticated coding practices, Python class methods are necessary. They differ distinctly from instance methods: they deal with a class instead of the instance.
Let’s see an example.
class DataScienceTool:
    tool_list = []

    @classmethod
    def add_tool(cls, name):
        cls.tool_list.append(name)

    def __init__(self, name):
        self.name = name
        DataScienceTool.add_tool(name)

# Adding tools to our list
DataScienceTool('Python')
DataScienceTool('R')

print(DataScienceTool.tool_list)
Here is the output.

In this example, add_tool is a class method. It adds new tools to the tool_list class attribute. We can create up to many instances. No matter how many of them there are, they still interact with the class through our method.
What are the advantages of using class methods? Class methods make your Python codes more flexible, maintainable, and commercially used for big data projects. Is that enough? If so, let’s first examine its syntax and implementation.
Syntax and Implementation of Python Class Method
The essence of the @classmethod decorator is to turn an ordinary method into a class one. Thus, you gain access to and can change attributes at the class level.
Therefore, not only the types of such methods are expanded but also the sphere of their application, which can be extended to work not exclusively within a specific instance.
According to the naming method, this method should have the first parameter named cls, which means the class itself and should correspond with self.
Steps to Implement a Python Class Method:
1. Use the @classmethod Decorator:
Place the @classmethod directly above the method definition of your method. This tells Python that this method should be treated as a class method.
2. Defining the Class Method:
This definition should start with the first parameter named cls. It can also have other parameters to achieve the desired functionality.
3. Access/Modify Class Attributes:
The next step is to enable the class method to use cls to interact with class attributes.
Simple Example
You should be able to create instances based on the diameter provided and do the calculations correctly. Let’s see the code.
class Circle:
    pi = 3.14159

    def __init__(self, radius):
        self.radius = radius

    @classmethod
    def from_diameter(cls, diameter):
        radius = diameter / 2
        return cls(radius)

    def area(self):
        return Circle.pi * (self.radius ** 2)

    def perimeter(self):
        return 2 * Circle.pi * self.radius
Here is a class being defined.
We start by creating a circle instance with a radius. We have also implemented another way to make a circle instance by providing the diameter, known as from_diameter, as the value class method.
It shows that a class can include alternative constructors. The area and perimeter instance method calculates the circle’s area and perimeter. It must be noted that instance methods call specific instance attributes perfused on self, a default Python idiom to relate machinery and data.Here is how to use this class:
# Creating a circle instance from diameter
circle = Circle.from_diameter(10)

print(f"Area: {circle.area()}")
print(f"Perimeter: {circle.perimeter()}")
Here is the output.

This code snippet showcases creating a Circle object with the diameter and further using the object to calculate the area and perimeter.
This example illustrates the practical application of Python class methods that can be implemented for class creation and object instantiation based on other conditions and input arguments.
Comparative Analysis

Once you have mastered the concept and understood the syntax, it would be useful to compare class methods with other methods in Python, such as instance and static methods. Such a comparative analysis will reveal when to employ one kind or another to improve the structure and reading of your code.
Class Methods vs. Instance Methods
- Python class methods are generally instance methods. A class method is an instance method based on an instance of the class or an object. You can use the self method to link the function to the instance to access the instance attributes or call the instance method. They are suitable for tasks that depend on the state of the object.
- A class method is a classifier method that affects the class as a whole. As stated above, using cls consequences will affect the class; using it as a “factory” is convenient because it allows you to create an object from different input data.
Key Differences and When to Use Each
- Instance Methods: Use this when your method needs to access or modify the object’s state. You could remove or add properties to the object or use existing values within it.
- Class Methods: Use this type when your method needs to alter the class state or when you need an alternative constructor.
- Static Methods: They are identified as @staticmethod and cannot directly access the instance or class. They are comparable to a set of functions, although they are inside the class’s namespace.
However, it keeps track of the class to which it belongs, thus the name Static Method. This is particularly required in utility functions when you need a function associated with the class without modifying its attributes or methods.
Understanding Their Roles
- Class Methods are for methods needing to access or change the class. This method is excellent for creating new instances or changing class-wide options. For example, it is a method for working with pre-defined statistics for instances.
- Static Methods are utility functions that can be related to the class without accessing its attributes or other methods.
Application in Data Science
Python class methods are critical in optimizing data science workflows by providing clients with convenient ways to accomplish everyday tasks. Methods have numerous uses in data science projects, from reading data to deploying advanced machine learning models and generating meaningful data visualization classes.
Scenarios Where Python Class Methods Shine in Data Science
Now, let’s see the scenarios where we need class methods.
Data Exploration and Preparation
- The first and the most essential part of Data Science projects is understanding Data. In this case, class methods help to apply different alternative data exploring methods simultaneously.
Data Analysis and Transformation
- Before analysis, datasets must undergo extensive modifications, such as categorizing and creating dummy variables. A common set of class methods should be used for all these transformations. This not only simplifies them but also facilitates their reuse and incorporation into the code.
Machine Learning Model Preparation
- The steps needed to preprocess data, split datasets, create lists for training and testing datasets, and set up machine learning models will be bundled into the class methods. This will make the model setup procedure more streamlined and reproducible.
Data Visualization:
- Class methods that provide visualization tools may assist in generating several plots rapidly with little repetition of code.
Practical Demonstrations

Now, let's see the Class method in action.
Data Exploration with Seaborn's Titanic Dataset
Data exploration begins by examining and familiarizing oneself with the dataset. This task involves revealing critical information on the survival rates, distribution of classes, and additional socio-economic aspects of the people aboard the Titanic using a dataset primarily taken from Seaborn’s Titanic.
The DataExplorer class has class methods used in this endeavor that simplify the process by showing quick views of the dataset's head and tail, as shown in the code.
import seaborn as sns
import pandas as pd

class DataExplorer:
    def __init__(self, data):
        self.data = data

    @classmethod
    def from_seaborn(cls, dataset_name):
        data = sns.load_dataset(dataset_name)
        return cls(data)

    def head(self, n=5):
        return self.data.head(n)

    def tail(self, n=5):
        return self.data.tail(n)

    def statistics(self):
        return self.data.describe()

# Example usage
explorer = DataExplorer.from_seaborn('titanic')
print(explorer.head())
print(explorer.tail())
print(explorer.statistics())
Here is the output.
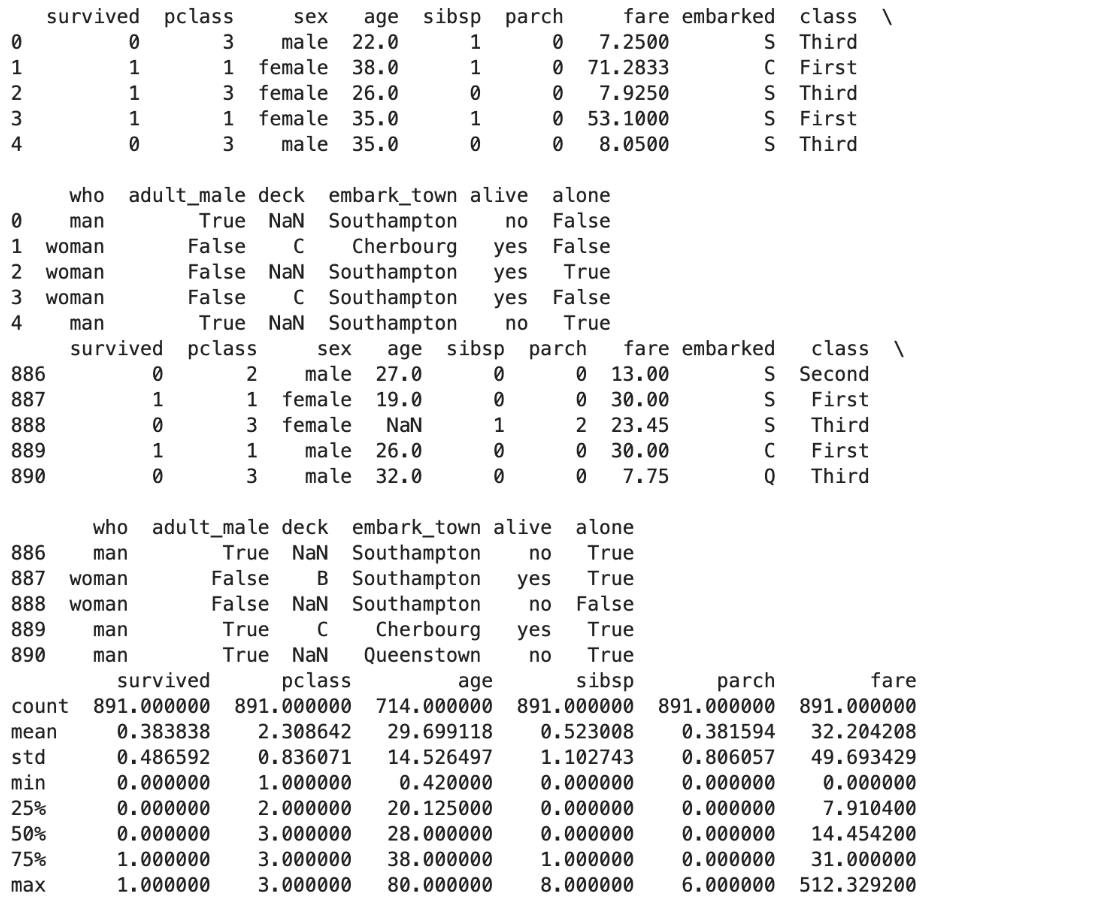
Here is what we did:
- Data Accessibility
- The DataExplorer class makes the preliminary exploration of the Titanic data simple. It presents convenient methods for checking the first and last rows of the dataset and a detailed statistical summary
- Insights Gained
- The head, tail, and statistics commands expose the dataset's structure. In other words, they help us understand what features the data is based upon and which distributions these features have.
- Foundation for Further Analysis
- Following the results of such an analysis, we can determine how missing values are distributed, search for relationships between variables, and transform the data to apply predictive modeling.
Data Analysis with Iris Dataset
Analyzing the Iris dataset is an excellent opportunity to showcase different data manipulation operations; I will focus primarily on feature engineering.
This improves the dataset to be adapted to analysis or machine learning.
We develop the following class to make the analysis process more universal and simple, as we can condense it into class methods:
import pandas as pd
from sklearn.datasets import load_iris
import numpy as np

class DataManipulator:
    def __init__(self, data):
        self.data = data

    @classmethod
    def from_sklearn(cls):
        data = load_iris()
        df = pd.DataFrame(data=np.c_[data['data'], data['target']],
                          columns=data['feature_names'] + ['target'])
        return cls(df)

    def categorize_sepal_length(self):
        bins = [0, 5, 6.5, np.inf]
        names = ['short', 'medium', 'long']
        self.data['sepal_length_category'] = pd.cut(self.data['sepal length (cm)'], bins, labels=names)
        return self.data

    def create_dummy_variables(self):
        self.data = pd.get_dummies(self.data, columns=['sepal_length_category'], prefix='sepal_length')
        return self.data

# Example usage
manipulator = DataManipulator.from_sklearn()
print(manipulator.categorize_sepal_length().head())
print(manipulator.create_dummy_variables().head())
Here is the output.

Let’s see what we did with this code:
- Data Preparation and Transformation
- Given the raw Iris dataset, the DataManipulator class centralizes the procedures required to load and manipulate the data—including categorizing sepal length and transforming this variable into feature vectors through dummy variables.
- Feature Engineering
- By enriching the dataset with organized categories, the sepal length is categorized meaningfully and easily interpretable. In the next step, generating dummy variables as feature vectors enables the proper numerical input required for analysis or modeling.
- Enhanced Dataset
- The transformed dataset now has additional features that encode sepal length categories, allowing for more sophisticated analyses or benefiting from the added feature information.
Machine Learning with the Iris Dataset
Machine learning with Iris data aims to problematize classification. Our focus on feature specifics makes the classification more difficult.
Thus, it creates a situation where the model’s performance by prediction can be measured more practically.
We also need to perform standard preprocessing to make sure the model has an opportunity to learn sufficiently about the data. Here is the code:
from sklearn.datasets import load_iris
from sklearn.model_selection import train_test_split
from sklearn.preprocessing import MinMaxScaler
from sklearn.svm import SVC
from sklearn.metrics import accuracy_score

class MLModel:
    def __init__(self, model, X_train, X_test, y_train, y_test):
        self.model = model
        self.X_train = X_train
        self.X_test = X_test
        self.y_train = y_train
        self.y_test = y_test

    @classmethod
    def with_preprocessing(cls, dataset_func, model_func=SVC, test_size=0.2, random_state=42):
        data = dataset_func()
        # Use only two features to make the classification problem harder
        X = data.data[:, :2]
        y = data.target
        X_train, X_test, y_train, y_test = train_test_split(X, y, test_size=test_size, random_state=random_state)

        # Preprocessing: Scaling the features to a [0, 1] range
        scaler = MinMaxScaler().fit(X_train)
        X_train_scaled = scaler.transform(X_train)
        X_test_scaled = scaler.transform(X_test)

        model = model_func(kernel='linear').fit(X_train_scaled, y_train)
        return cls(model, X_train_scaled, X_test_scaled, y_train, y_test)

    def evaluate(self):
        predictions = self.model.predict(self.X_test)
        return accuracy_score(self.y_test, predictions)

# Example usage
iris_model = MLModel.with_preprocessing(load_iris)
print(f"Model accuracy: {iris_model.evaluate():.2f}")
Here is the output.

Here is what we did with the code above:
- Setup and Data Preparation:
- The Iris dataset is loaded, and some preparation is performed in advance for machine learning.
- Model Training:
- One of only two possible features will be used to complicate the task further. It initializes an SVC model with a linear kernel and trains it on scaled feature data.
- Evaluation:
- SVC classifies Iris species using the chosen features. The model‘s test set accuracy score quantitatively estimates how well it performs.
Data Visualization with the Iris Dataset
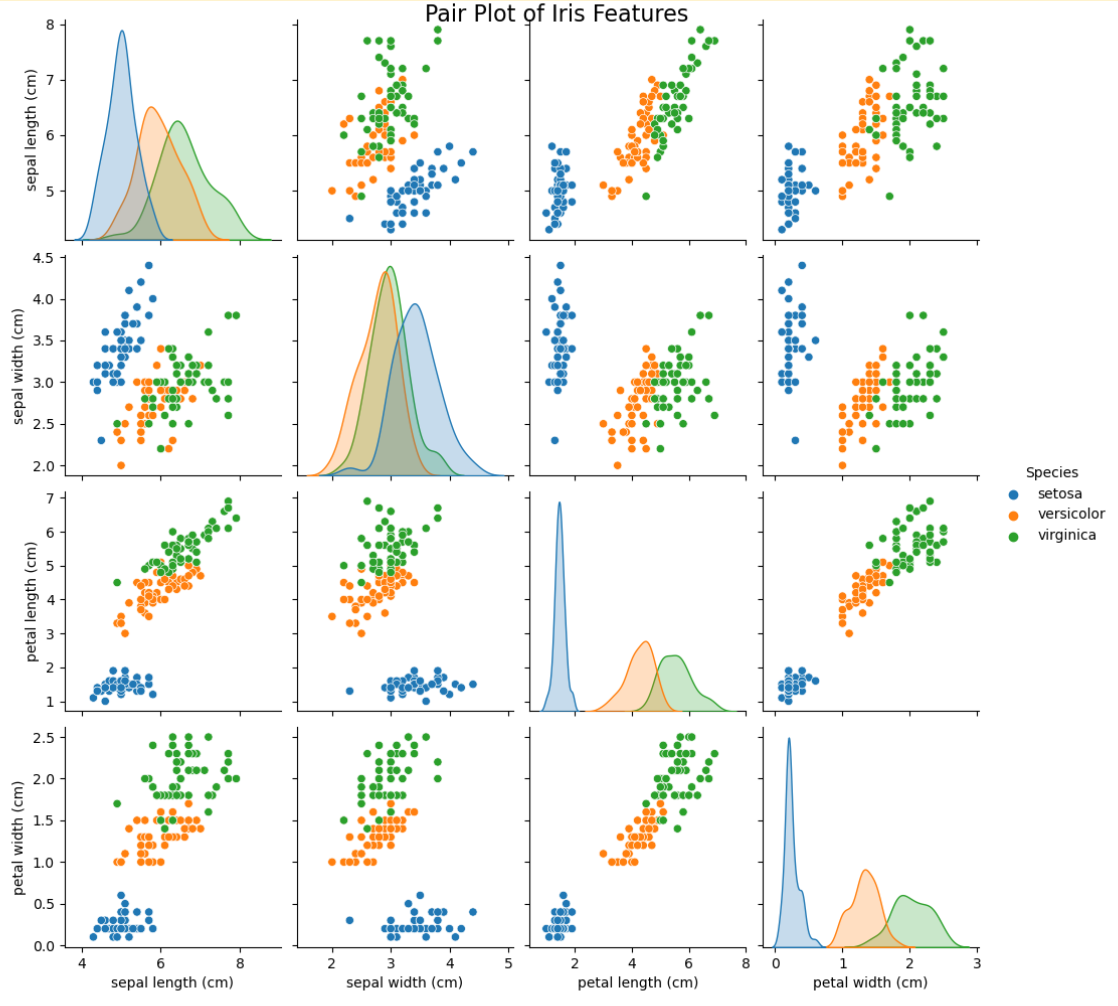
Before working with the Iris dataset, exploring patterns, relationships, and anomalies is essential. visually, Let's create a few different plots:
- Scatter plot: To visualize the relationships between features
- Pair plot: To see all possible relationships and distribution of individual features
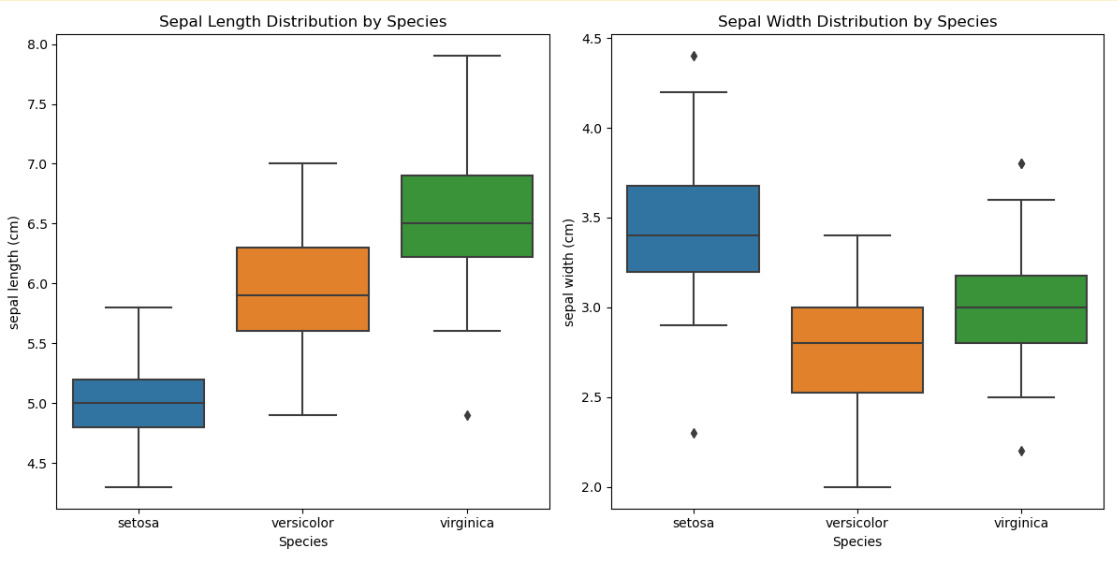
- Box plot: To examine the distribution and detect any outliers.
Now, let’s see the code.
import seaborn as sns
import matplotlib.pyplot as plt
from sklearn.datasets import load_iris
import pandas as pd

class IrisVisualizer:
    @classmethod
    def load_data(cls):
        # Load the Iris dataset and prepare it as a DataFrame
        iris = load_iris()
        iris_df = pd.DataFrame(data=iris.data, columns=iris.feature_names)
        iris_df['Species'] = pd.Categorical.from_codes(iris.target, iris.target_names)
        return iris_df

    @classmethod
    def scatter_plot(cls):
        iris_df = cls.load_data()
        plt.figure(figsize=(10, 6))
        sns.scatterplot(x='sepal length (cm)', y='sepal width (cm)', hue='Species', data=iris_df)
        plt.title('Iris Sepal Length vs Width')
        plt.xlabel('Sepal Length (cm)')
        plt.ylabel('Sepal Width (cm)')
        plt.legend(title='Species')
        plt.show()

    @classmethod
    def pair_plot(cls):
        iris_df = cls.load_data()
        sns.pairplot(iris_df, hue='Species', height=2.5)
        plt.suptitle('Pair Plot of Iris Features', verticalalignment='baseline', fontsize=16)
        plt.show()

    @classmethod
    def box_plot(cls):
        iris_df = cls.load_data()
        plt.figure(figsize=(12, 6))
        plt.subplot(1, 2, 1)
        sns.boxplot(x='Species', y='sepal length (cm)', data=iris_df)
        plt.title('Sepal Length Distribution by Species')

        plt.subplot(1, 2, 2)
        sns.boxplot(x='Species', y='sepal width (cm)', data=iris_df)
        plt.title('Sepal Width Distribution by Species')
        plt.tight_layout()
        plt.show()

# Example usage
IrisVisualizer.scatter_plot()
IrisVisualizer.pair_plot()
IrisVisualizer.box_plot()
Here is the output.
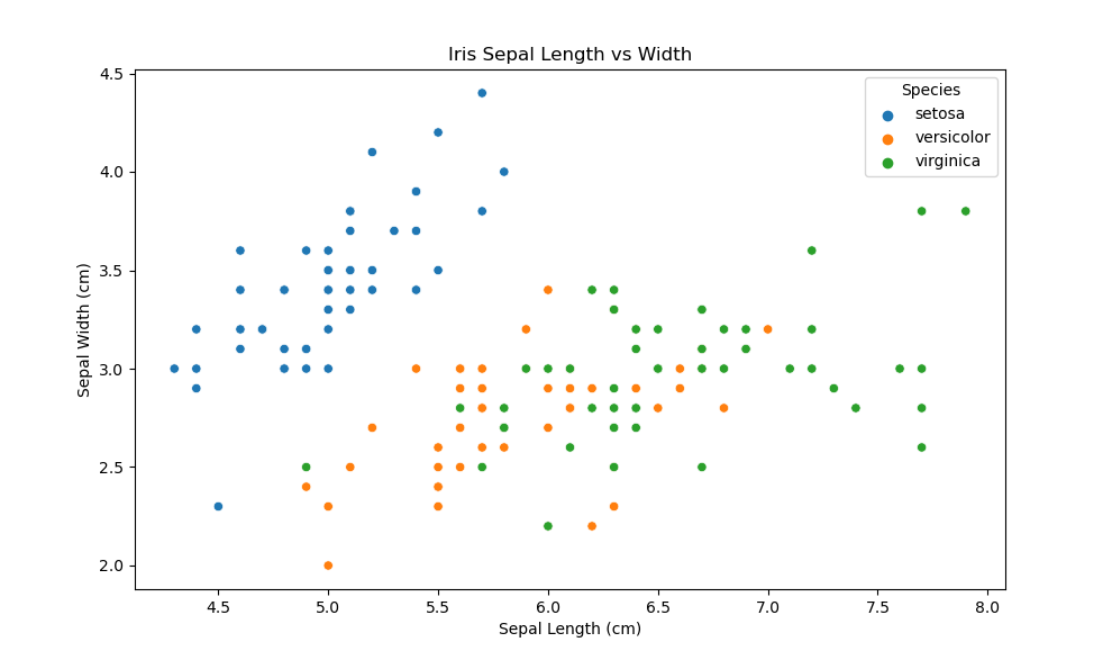
Here is what we did with this code above:
Setup and Data Preparation:
- Libraries: Seaborn, Matplotlib, and Pandas are imported for plotting and data manipulation.
- Iris Dataset: The Scikit-learn dataset was loaded and converted to a Pandas dataframe; the Species column was made evident to label the plots.
Visualizations:
- Scatter Plot: Sepal length vs Width, with each point colored by Species to visually assess feature differences among species.
- Pair Plot: A more visual representation provides complete information about the relationships of features and their distributions, demonstrates possible correlations, and allows distinguishing features by coloring them according to the class.
- Box Plots: The accurate distribution of sepal dimensions and the level of variability in each species can help to detect outliers and highlight the most discriminative features.
Such an approach allows encapsulating the logic of visualization inside class methods, which improves reusability and code clarity and demonstrates a structured exploration process.
Best Practices and Guidelines
Thus, following the best while incorporating the Python class methods into data science projects can drastically improve your code’s clarity, maintainability, and performance.
Tips for Writing Effective Python Class Methods
Here are the most vital tips, along with frequent pitfalls to remember.
Clear Purpose: Every class method should only serve one straightforward purpose. This practice would make your code easy to read and debug.
Use cls Wisely: When using the cls parameter, interact with the class’s attributes or call other class methods. Do not include the instance-specific logic within the class methods.
Alternative Constructors: Utilize class methods as alternative constructors to work with other forms of data input or more revealing ways to create instances.
Documentation: Document your class methods well. Describe what the technique does, its parameters, and what it returns. This practice will help keep the code; someone else can read and understand it.
Consistent Naming: Paste a naming convention on the method’s purpose. This practice will make the process easy to read and discover.
Common Pitfalls to Avoid
In this section, let’s see the common pitfalls you must avoid.
Overusing class methods: Not all methods should be a class method. They should only be used when the operation’s meaning is tied to the class rather than individual instances.
Confusing class methods with a static one: A class method operates on a class and can access its attributes, while a static method does not access the class or its instances. Do not use class methods when a static or a regular instance method is more appropriate.
Neglecting thread safety: Consider modifying class attributes from class methods, especially in a multi-threaded context.
Complexity in constructors: Alternative constructors are valuable, but constructor method calls should not form a single intricate maze. Each constructor should be a clear and simple pathway to an instance creation.
Neglecting return types: Ensure that your class methods return instances of this class when used as alternative constructors or one more relevant data for the method’s purpose.
By following these best practices and avoiding common pitfalls, you can harness the full potential of Python class methods to write clean, efficient, and maintainable code in your data science projects.
Conclusion
In this article, we have explored the essential aspects of Python class methods, highlighting their distinctiveness from instance and static methods and their significance in data science applications for more flexible object instantiation and efficient code management.
If you must practice Python, look at these Python Interview Questions to learn more about it and hone your skills. Remember, the best way to hone your skills is by repetition.
You can do this by cracking interview questions or data projects from the StrataScratch platform.
Share
