Basic Data Structure Types You Must Know

Categories:
 Written by:
Nathan Rosidi
Master essential data structures like linked lists, stacks, and queues to efficiently manage dynamic data and boosting your overall programming efficiency.
Have you ever wondered how you can efficiently manage data that changes unpredictably? I recall when I first stumbled upon various data structures—it completely transformed how I handle dynamic information.
I'll guide you through essential data structures like linked lists, stacks, and queues in this article. We'll explore their unique strengths and practical uses with code examples.
Linked Lists Data Structures
Have you ever struggled with managing data that grows and shrinks unpredictably? I remember when I first stumbled upon linked lists—they changed how I approached dynamic data!
Linked lists offer a flexible, dynamic structure for efficient insertion and deletion; unlike arrays, which store elements contiguously in memory, linked lists consist of nodes connected via pointers. Each node holds data and a reference to the next node.
This setup shines when the dataset size isn't known upfront or frequent modifications are needed. It's beneficial for tasks requiring adaptability. We will use three different methods in this part, so let’s get started.
Singly Linked List
A singly linked list is the simplest form, where each node points to the next in sequence. It's ideal when you only need to traverse the list in one direction.
Let's implement a simple singly linked list in Python. Each node will hold a member's financial information (e.g., plan_premium) and point to the next node. We'll also add functionality to limit the number of displayed rows.
class Node:
    def __init__(self, data):
        self.data = data  # Stores the data (e.g., financial value)
        self.next = None  # Points to the next node in the list

class SinglyLinkedList:
    def __init__(self):
        self.head = None  # Initial head of the list

    # Insert a new node at the end of the list
    def insert(self, data):
        new_node = Node(data)
        if self.head is None:
            self.head = new_node
        else:
            current = self.head
            while current.next:
                current = current.next
            current.next = new_node

    # Display the linked list, showing only the first few rows
    def display(self, rows=5):
        current = self.head
        count = 0
        while current and count < rows:
            print(f"Plan Premium: ${current.data:.2f}")
            current = current.next
            count += 1
        if current is None:
            print("End of list reached.")
        else:
            print(f"... Displaying only the first {rows} rows.")

# Example usage
linked_list = SinglyLinkedList()

# Let's assume we extract 'plan_premium' values from the dataset
plan_premiums = data['plan_premium'].replace('[\$,]', '', regex=True).astype(float).tolist()

# Insert each premium into the linked list
for premium in plan_premiums:
    linked_list.insert(premium)

# Display only the first 5 rows of the linked list
linked_list.display(rows=5)
Here is the output.

This code defines a Node class to store data and a pointer to the next node. The SinglyLinkedList class manages the list by inserting new nodes at the end and displaying it. We've added an option to limit the number of rows displayed by passing a rows parameter to the display() function.
This is useful when you want to quickly inspect a portion of the data without overwhelming the output.
Doubly Linked List
A doubly linked list extends the concept by allowing traversal in both directions. Each node conveniently has pointers to both the next and previous nodes.
This can be incredibly beneficial when you need to backtrack through the list. Let's enhance our linked list to a doubly linked list.
class Node:
    def __init__(self, data):
        self.data = data  # Stores the data (e.g., financial value)
        self.next = None  # Points to the next node in the list

class SinglyLinkedList:
    def __init__(self):
        self.head = None  # Initial head of the list

    # Insert a new node at the end of the list
    def insert(self, data):
        new_node = Node(data)
        if self.head is None:
            self.head = new_node
        else:
            current = self.head
            while current.next:
                current = current.next
            current.next = new_node

    # Display the linked list, showing only the first few rows
    def display(self, rows=5):
        current = self.head
        count = 0
        while current and count < rows:
            print(f"Plan Premium: ${current.data:.2f}")
            current = current.next
            count += 1
        if current is None:
            print("End of list reached.")
        else:
            print(f"... Displaying only the first {rows} rows.")

# Example usage
linked_list = SinglyLinkedList()

# Let's assume we extract 'plan_premium' values from the dataset
plan_premiums = data['plan_premium'].replace('[\$,]', '', regex=True).astype(float).tolist()

# Insert each premium into the linked list
for premium in plan_premiums:
    linked_list.insert(premium)

# Display only the first 5 rows of the linked list
linked_list.display(rows=5)
Here is the output.

In this example, we've implemented a doubly linked list with options to display the first or last few rows. Forward traversal proves helpful for typical sequential processing.
In contrast, backward traversal assists in scenarios where you must inspect recent entries, such as the most recent financial transactions.
Circular Linked List
The last node loops back to the first in a circular linked list, forming a continuous cycle. This structure often proves handy when continuous cycling is needed, such as in scheduling algorithms or buffer management.
Here's how to implement a circular linked list for our dataset.
class Node:
    def __init__(self, data):
        self.data = data
        self.next = None

class CircularLinkedList:
    def __init__(self):
        self.head = None

    # Insert a new node at the end of the list
    def insert(self, data):
        new_node = Node(data)
        if self.head is None:
            self.head = new_node
            new_node.next = self.head  # Point to itself
        else:
            current = self.head
            while current.next != self.head:
                current = current.next
            current.next = new_node
            new_node.next = self.head

    # Display the circular linked list, showing only the first few rows
    def display(self, rows=5):
        current = self.head
        count = 0
        if self.head is not None:
            while count < rows:
                print(f"Plan Premium: ${current.data:.2f}")
                current = current.next
                count += 1
                if current == self.head:
                    break
            print(f"... Displaying only the first {rows} rows.")

# Example usage
circular_linked_list = CircularLinkedList()

# Insert the same 'plan_premium' values as before
for premium in plan_premiums:
    circular_linked_list.insert(premium)

# Display only the first 5 rows of the circular linked list
circular_linked_list.display(rows=5)
Here is the output.

The circular linked list now displays only the first few rows. It loops back to the start if it reaches the end before showing the specified number of rows. This setup is ideal for tasks requiring cyclic processing or continuous monitoring of financial data streams.
Stacks Data Structures
Stacks are a simple yet powerful data structure based on the Last In, First Out (LIFO) principle. Think of a stack of plates: you add a new plate on top, and when you remove one, you remove it from the top.
The most recently added item in a stack is always the first to be removed. They're helpful when you must reverse a sequence, manage nested structures like function calls, or handle backtracking processes.
In this section, we'll explore four different kinds of stacks. Let's dive in!
Push
The push operation adds an element to the top of the stack.
Here’s how you can implement a stack in Python using a list. We’ll push financial data (e.g., plan_premium) onto the stack.
class Stack:
    def __init__(self):
        self.stack = []

    def push(self, data):
        self.stack.append(data)

    def display(self):
        print("Current Stack (Top to Bottom):")
        for item in reversed(self.stack):
            print(f"Plan Premium: ${item:.2f}")

stack = Stack()

for premium in plan_premiums[:5]:  # Limiting to the first 5 values
    stack.push(premium)

stack.display()
Here is the output.

By leveraging Python's list, you can effortlessly implement a stack. We eagerly push several financial premiums onto it and then display the stack in reverse order (top to bottom).
Stacks are incredibly handy when you need to reverse a sequence or temporarily store data for later use.
Pop
The pop operation removes the top element from the stack.
We’ll extend the previous stack implementation to allow popping elements from the stack.
class Stack:
    def __init__(self):
        self.stack = []

    def push(self, data):
        self.stack.append(data)

    def pop(self):
        if not self.is_empty():
            return self.stack.pop()
        else:
            return "Stack is empty."

    def is_empty(self):
        return len(self.stack) == 0

    def display(self):
        print("Current Stack (Top to Bottom):")
        for item in reversed(self.stack):
            print(f"Plan Premium: ${item:.2f}")

stack = Stack()

for premium in plan_premiums[:5]:  # Limiting to the first 5 values
    stack.push(premium)

stack.display()

popped_premium = stack.pop()
print(f"\nPopped Plan Premium: ${popped_premium:.2f}")

stack.display()
Here is the output.
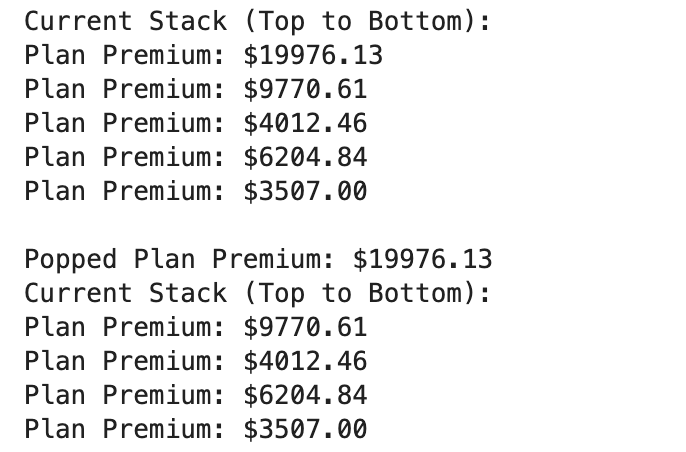
The pop() method removes and returns the topmost item from the stack. It's convenient when dealing with nested data structures or sequential operations that need reversing.
You might tackle a complex project where popping from a stack made managing these scenarios so much more efficient!
Peek
The peek operation lets you view the top element without removing it from the stack.
Here’s how to implement the peek operation in our stack.
class Stack:
    def __init__(self):
        self.stack = []

    # Push an element onto the stack
    def push(self, data):
        self.stack.append(data)

    # Pop an element from the stack
    def pop(self):
        if not self.is_empty():
            return self.stack.pop()
        else:
            return "Stack is empty."

    # Peek at the top element
    def peek(self):
        if not self.is_empty():
            return self.stack[-1]
        else:
            return "Stack is empty."

    # Check if the stack is empty
    def is_empty(self):
        return len(self.stack) == 0

    # Display the stack
    def display(self):
        print("Current Stack (Top to Bottom):")
        for item in reversed(self.stack):
            print(f"Plan Premium: ${item:.2f}")

# Example usage
stack = Stack()

# Push 'plan_premium' values onto the stack
for premium in plan_premiums[:5]:  # Limiting to the first 5 values
    stack.push(premium)

# Peek at the top element
top_premium = stack.peek()
print(f"Top Plan Premium (without removing): ${top_premium:.2f}")

# Display the stack
stack.display()
Here is the output.

The peek() method lets you see the top element without altering the stack's state. This operation is perfect when you must review the last calculation in a sequence or check the latest transaction without removing it.
IsEmpty
The is_empty operation checks whether the stack is empty, essential for preventing errors during pop() or peek() operations.
We’ve already implemented the is_empty() method in previous examples. Let’s see it in action.
# Example usage continued from above

# Check if the stack is empty
if stack.is_empty():
    print("The stack is empty.")
else:
    print("The stack is not empty.")

# Pop all elements to empty the stack
while not stack.is_empty():
    stack.pop()

# Check if the stack is empty now
if stack.is_empty():
    print("The stack is now empty.")
else:
    print("The stack is not empty.")
Here is the output.

The is_empty() method ensures that operations like pop() and peek() are only performed when the stack has elements. This prevents potential errors like accessing data from an empty stack—a common issue in real-world applications.
Queues Data Structures
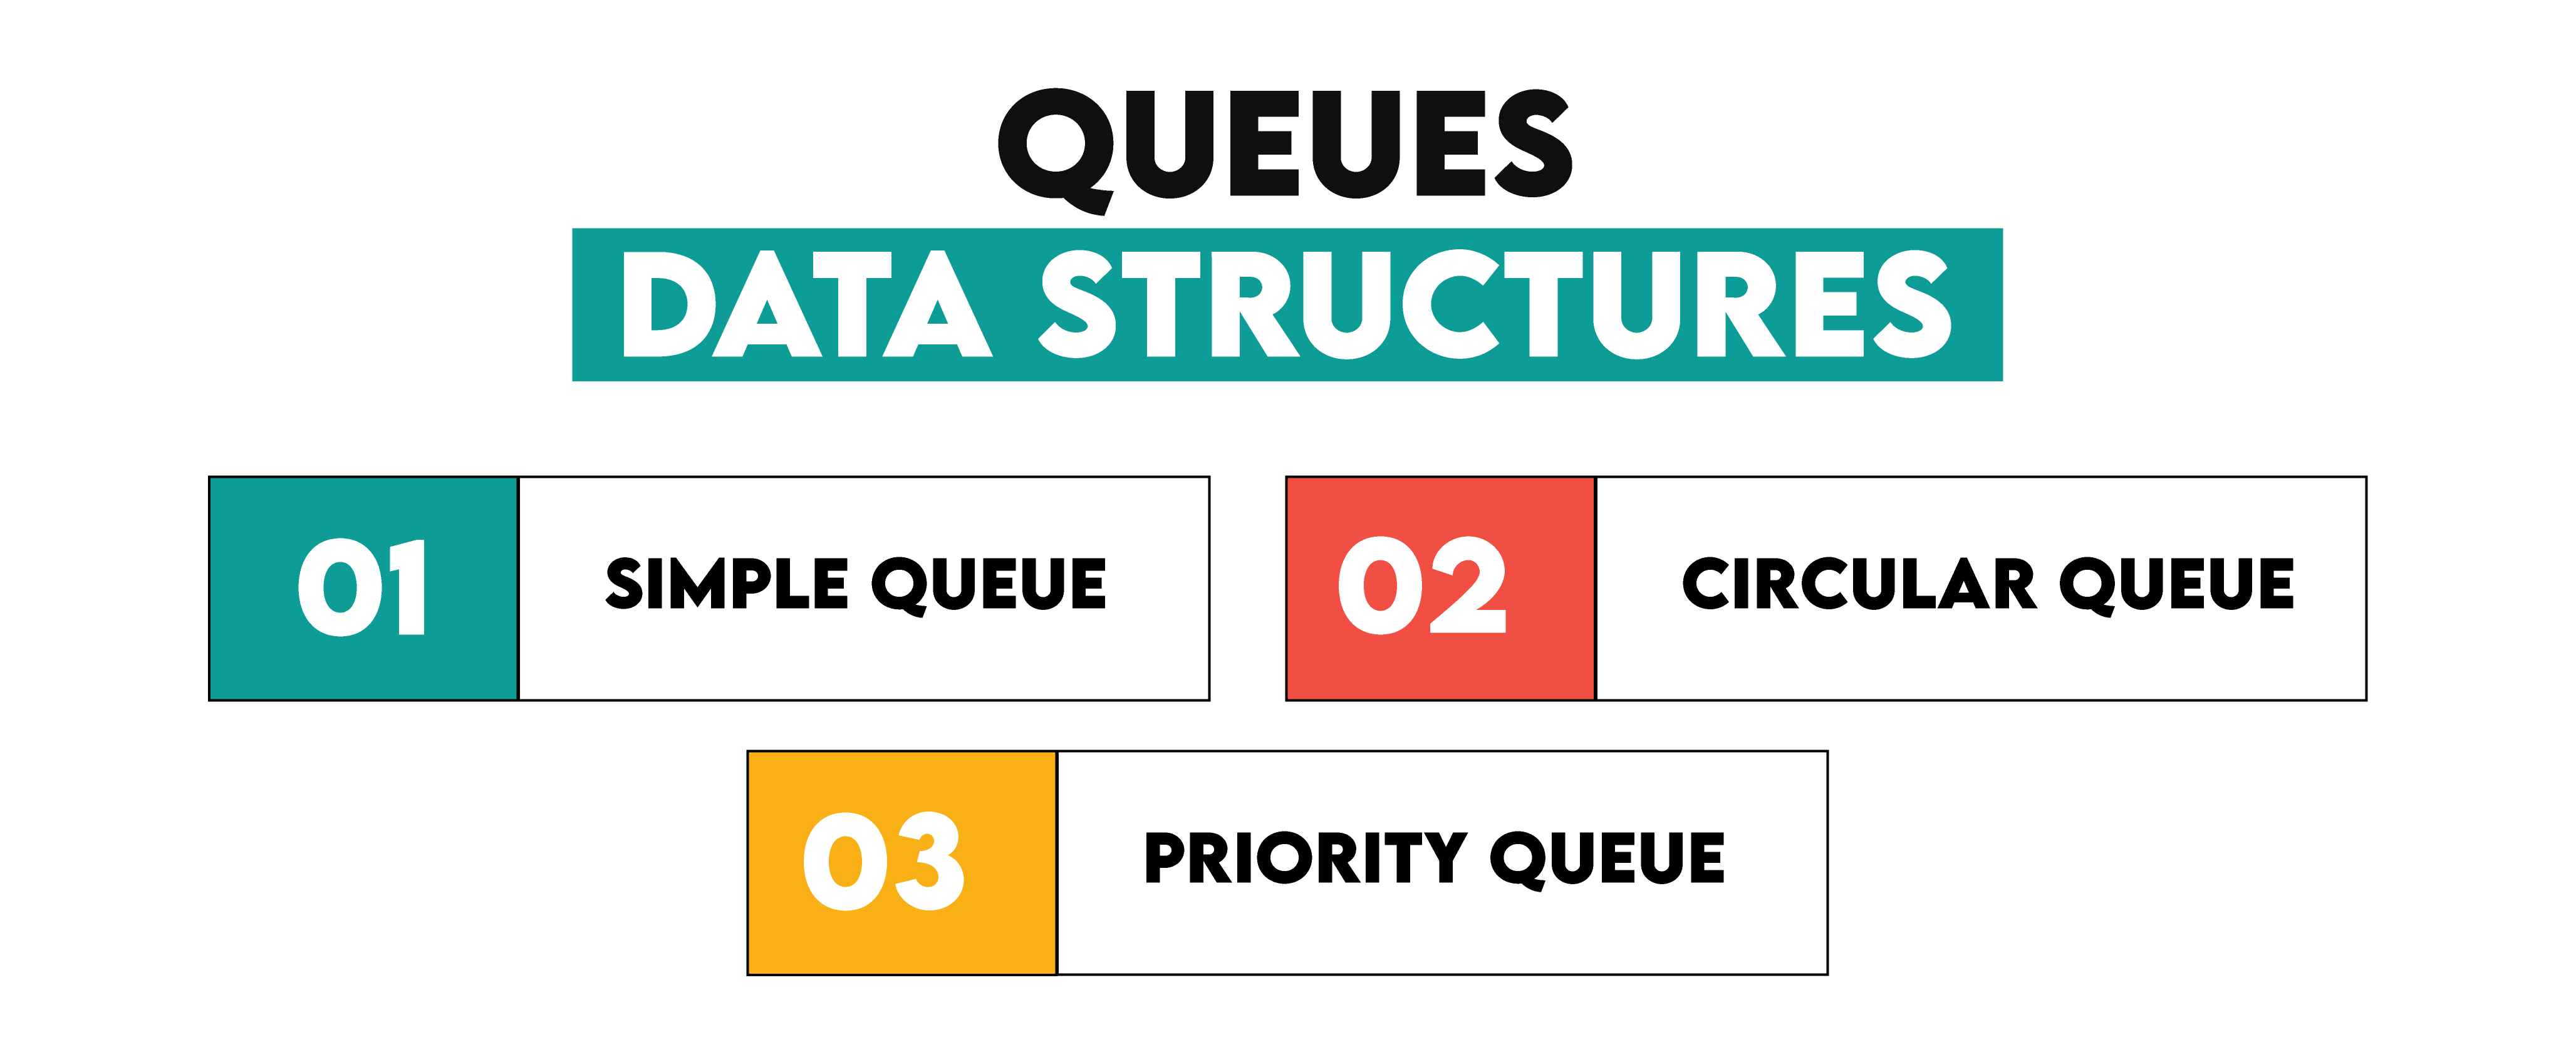
Queues are fundamental data structures based on the first-in, first-out (FIFO) principle. Imagine people standing in line—you add elements at the rear and remove them from the front.
They're instrumental when you need to handle tasks in the order they arrive. Think scheduling, handling incoming requests, or managing data streams.
In this section, we will explore its applications.
Simple Queue
A basic queue follows the FIFO (First In, First Out) principle. It consists of adding elements to the back and removing them from the front.
I will give you a simple example of how to write a queue using the list in PYTHON. That is something we will use to maintain financial data like plan_premium.
class Queue:
    def __init__(self):
        self.queue = []

    def enqueue(self, data):
        self.queue.append(data)

    def dequeue(self):
        if not self.is_empty():
            return self.queue.pop(0)
        else:
            return "Queue is empty."

    def is_empty(self):
        return len(self.queue) == 0

    def display(self):
        print("Current Queue (Front to Rear):")
        for item in self.queue:
            print(f"Plan Premium: ${item:.2f}")

queue = Queue()

for premium in plan_premiums[:5]:  # Limiting to the first 5 values
    queue.enqueue(premium)

queue.display()

dequeued_premium = queue.dequeue()
print(f"\nDequeued Plan Premium: ${dequeued_premium:.2f}")

queue.display()
Here is the output.
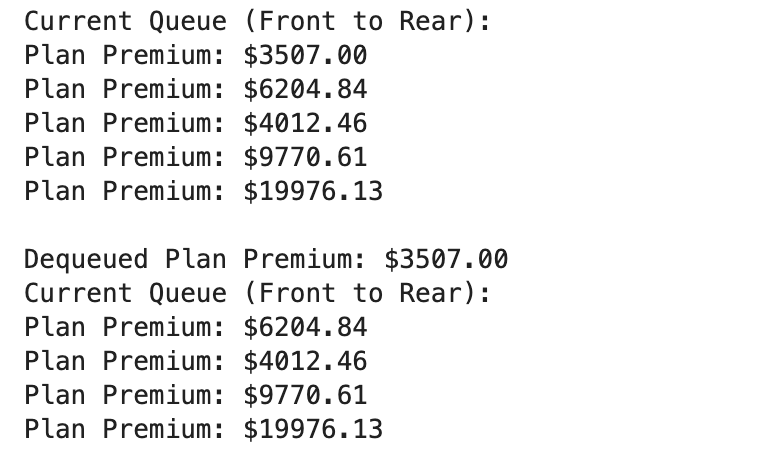
This code implements a simple queue using Python's list. We enqueue several financial premiums and display the queue from front to rear.
The dequeue() operation removes the first element added. This simulates real-world scenarios, such as processing financial transactions in the order they arrive.
Circular Queue
Have you ever wondered how to utilize a queue in the right way? A circular queue is an advanced form of non-full Queue in which the rear wraps around to the front instead of having a blocking mechanism.
A circular queue is used where the data can be represented as in a circle. The following describes how to create a fixed-size list-based round();
class CircularQueue:
    def __init__(self, size):
        self.queue = [None] * size
        self.max_size = size
        self.front = -1
        self.rear = -1

    def enqueue(self, data):
        if (self.rear + 1) % self.max_size == self.front:
            print("Queue is full.")
        elif self.front == -1:  # First element
            self.front = 0
            self.rear = 0
            self.queue[self.rear] = data
        else:
            self.rear = (self.rear + 1) % self.max_size
            self.queue[self.rear] = data

    def dequeue(self):
        if self.front == -1:
            print("Queue is empty.")
            return None
        elif self.front == self.rear:  # Only one element left
            data = self.queue[self.front]
            self.front = -1
            self.rear = -1
            return data
        else:
            data = self.queue[self.front]
            self.front = (self.front + 1) % self.max_size
            return data

    def is_empty(self):
        return self.front == -1

    def display(self):
        if self.is_empty():
            print("Queue is empty.")
        else:
            print("Current Circular Queue (Front to Rear):")
            if self.rear >= self.front:
                for i in range(self.front, self.rear + 1):
                    print(f"Plan Premium: ${self.queue[i]:.2f}")
            else:
                for i in range(self.front, self.max_size):
                    print(f"Plan Premium: ${self.queue[i]:.2f}")
                for i in range(0, self.rear + 1):
                    print(f"Plan Premium: ${self.queue[i]:.2f}")
circular_queue = CircularQueue(5)

for premium in plan_premiums[:5]:  # Limiting to the first 5 values
    circular_queue.enqueue(premium)

circular_queue.display()

dequeued_premium = circular_queue.dequeue()
print(f"\nDequeued Plan Premium: ${dequeued_premium:.2f}")

circular_queue.display()
Here is the output.
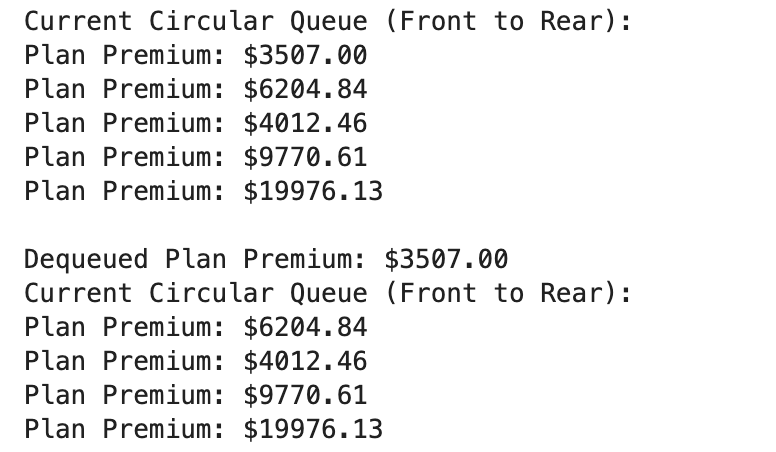
This implementation wraps the queue around when necessary, efficiently using available space. Circular queues are useful when handling fixed-size buffers or scheduling cyclic tasks.
Think about processing batches of financial data—a circular queue can be a real asset.
Priority Queue
Did one thing that had to get done suddenly become more important than everything else? A priority queue is an abstract data type in which each element has a certain priority, and aspects with higher priorities are dequeued before lower-priority elements.
This is a good structure for times you need something immediately, such as task scheduling! Implementation of a Priority Queue using heapq module in Python.
import heapq

class PriorityQueue:
    def __init__(self):
        self.queue = []
    def enqueue(self, priority, data):
        heapq.heappush(self.queue, (priority, data))
    def dequeue(self):
        if not self.is_empty():
            return heapq.heappop(self.queue)[1]
        else:
            return "Queue is empty."

    def is_empty(self):
        return len(self.queue) == 0

    def display(self):
        print("Current Priority Queue (Highest to Lowest Priority):")
        for priority, data in sorted(self.queue):
            print(f"Priority {priority}: Plan Premium ${data:.2f}")

priority_queue = PriorityQueue()

for index, premium in enumerate(plan_premiums[:5]):  # Limiting to the first 5 values
    priority_queue.enqueue(index + 1, premium)  # Assigning priority based on index

priority_queue.display()

dequeued_premium = priority_queue.dequeue()
print(f"\nDequeued Plan Premium: ${dequeued_premium:.2f}")

priority_queue.display()
Here is the output.
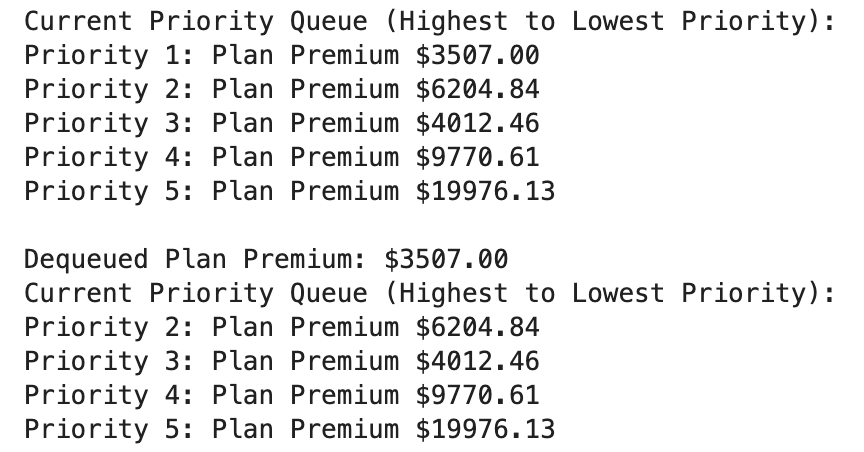
In this implementation, the priority queue ensures elements with the highest priority (lowest number) are processed first.
Priority queues are invaluable when tasks or events need prioritization, such as processing high-value transactions before others.
Final Thoughts
You equip yourself with tools to tackle various tasks by grasping these fundamental structures. Whether managing financial data or scheduling operations, choosing the right data structure makes all the difference.
Mastering these structures will help you select the right one for each task, boosting your programming efficiency. To sharpen your abilities further, check out algorithm questions on StrataScratch.
Share
