4 Data Collection Libraries in Python That You Should Know
 Written by:
Nathan Rosidi
When collecting data, there are four most important Python libraries you should know. We’ll show you their workings on real-life scraping data examples.
Data collection is an essential step of a data science project, including taking data from different sources like websites, APIs, and databases.
To collect data from these sources, you need to know the techniques that help you do that. Python is a popular programming language for data science, and many useful libraries exist to do data collection. This article will explore four of them: Request, Scrapy, Selenium, and Beautiful Soup.
What are Python libraries?

Python libraries contain different predefined functions that help developers solve their problems in different fields like data collecting, machine learning, data visualization, and more. In data science, there are a bunch of famous libraries that exist to do that.
You can find the overview of these functions in our article “Top 18 Python Libraries”.
But today, we’ll focus on the data collection Python libraries. We’ll explain how they work so you can use them when collecting data.
Data Collection
Data collection is the process of gathering and measuring information according to your project needs in order to answer the question you want to answer. Data collection is a vital part of many projects because it produces raw materials.
After collecting data, you have to build a pipeline to convert this unstructured data into a version in which you can conduct analysis and draw conclusions.
In the context of data science, data collection is important because it is the first step in the process of making data-driven decisions. By collecting data that fulfills your needs in your project, data scientists can begin to explore and analyze the data to uncover patterns and trends.
Also, this process allows data scientists to build and train machine learning and deep learning models. Machine learning algorithms require a large amount of data to provide effective models, and the quality of the data also has an important impact on the accuracy of the model.
4 Data Collection Libraries That Every Data Scientist Should Know
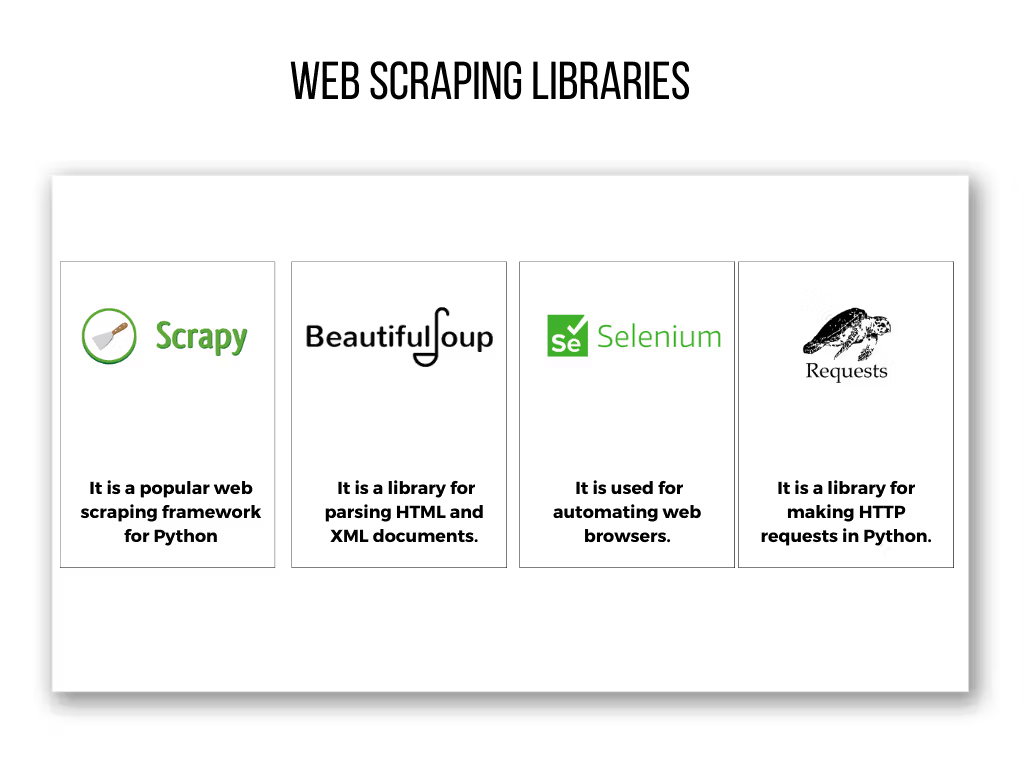
Let’s dig deeper into each by expanding the description first and showing their syntax with real-life examples.
Scrapy

Scrapy is a free and open-source web crawling framework written in Python. It extracts data from websites and saves it in a structured format, such as CSV. Scrapy is useful for large-scale data extraction jobs and is designed to be fast and efficient.
Let’s see the its syntax.
conda install -c condad—forge scrapy for conda
pip install scrapy for Mac OSX
This code installs the scrapy library for different environments.
Scraping From Reddit
We will use scrapy to extract information from the following URL, which is about Machine Learning in Reddit, here is the link.
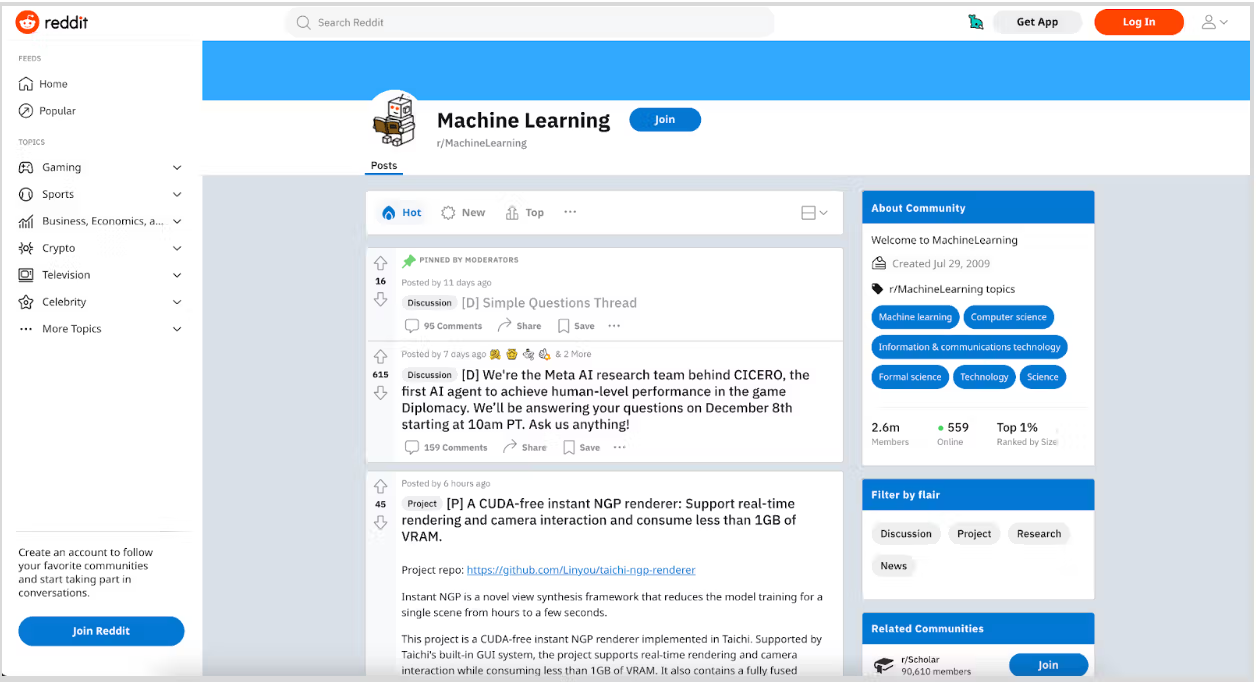
This code is used to open an interactive shell, which allows us to experiment with scrapy functions.
To see the functions of Scrapy, paste ‘scrapy’ in your command line.
Here is the code and its output.
scrapy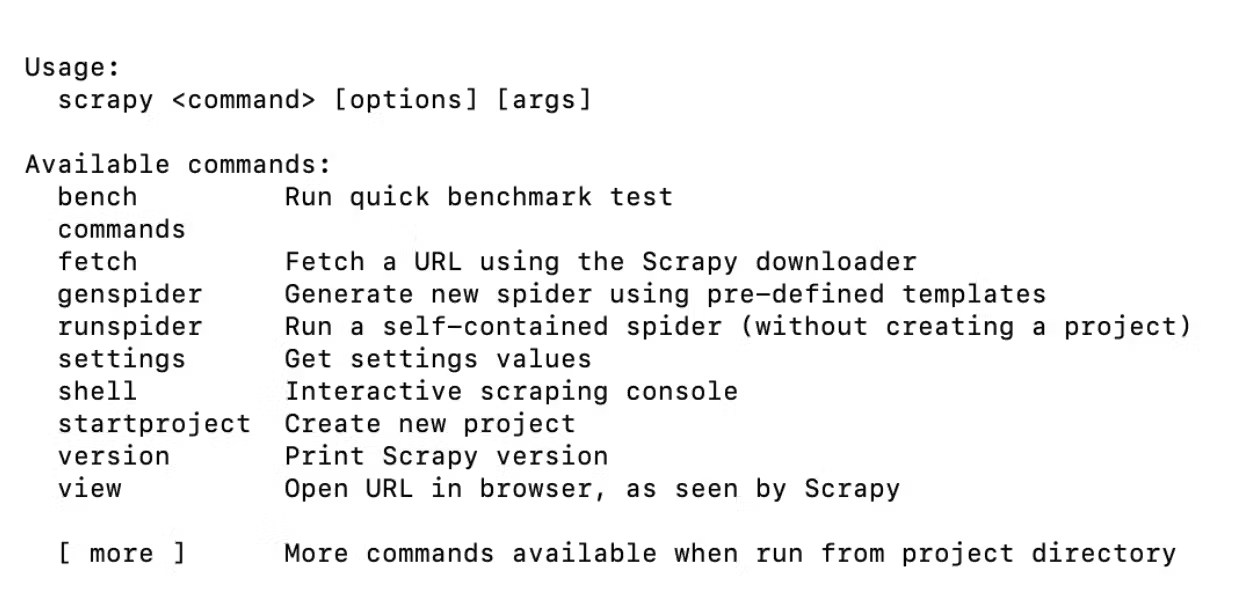
The following code is used to open a Scrapy shell, which allows the user to experiment with it and debug Scrapy commands.
Here is the code.
scrapy shellNow, this method is used to send an HTTP request to a given URL and return the response.
fetch(“https://www.reddit.com/r/MachineLearning/”)
The below codes show how you can display the response.
When you crawl something with Scrapy, it returns a response object which contains the downloaded website. We will use the following code to see what the crawler has downloaded.
view(response)
Here is the output of this code.

It is actually a copy of the website you want to scrape in your environment, which you fetched in the previous step.
Also, using the text function with response helps you to see the raw text of the response.
response.text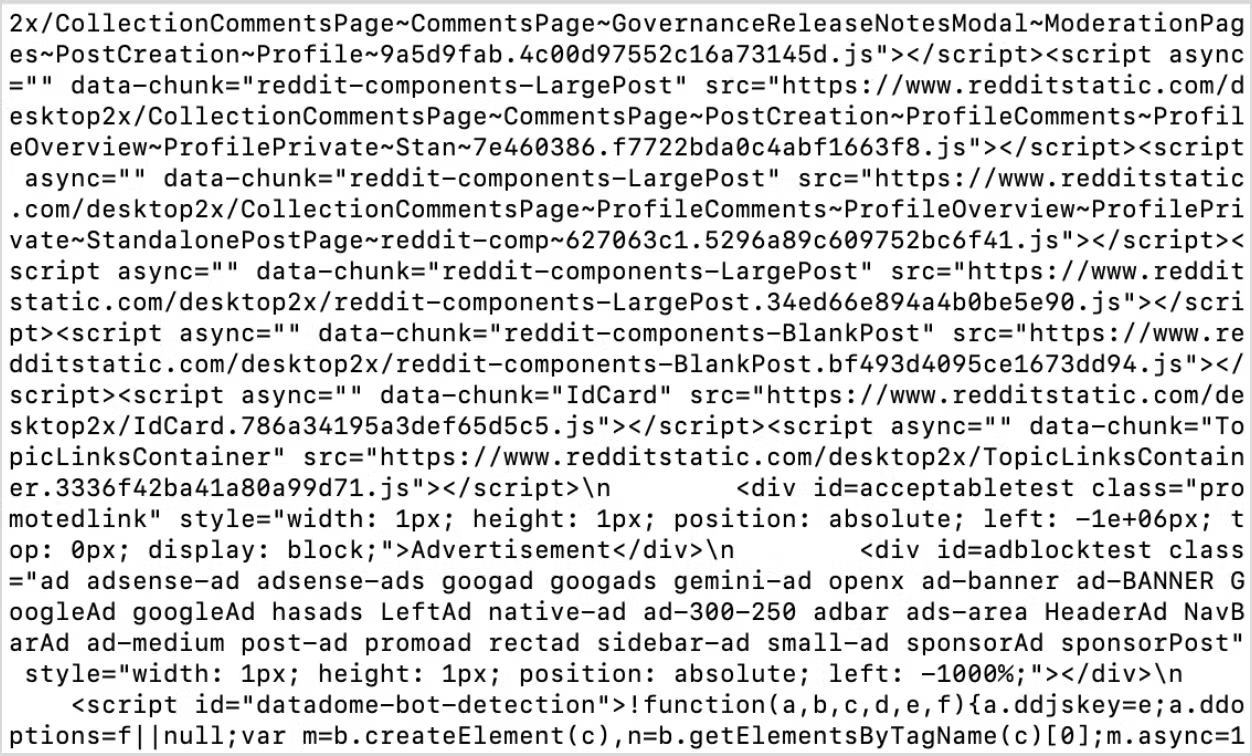
The following code will extract information from this raw material. It extracts information from the response by using a CSS selector.
We will use this CSS selector to extract headings. You can look at these CSS selectors by right-clicking on the page and then clicking on inspect. This standard procedure helps you to inspect the source of the page. That way, you can see the source of the page and the class name, as shown in the below image.
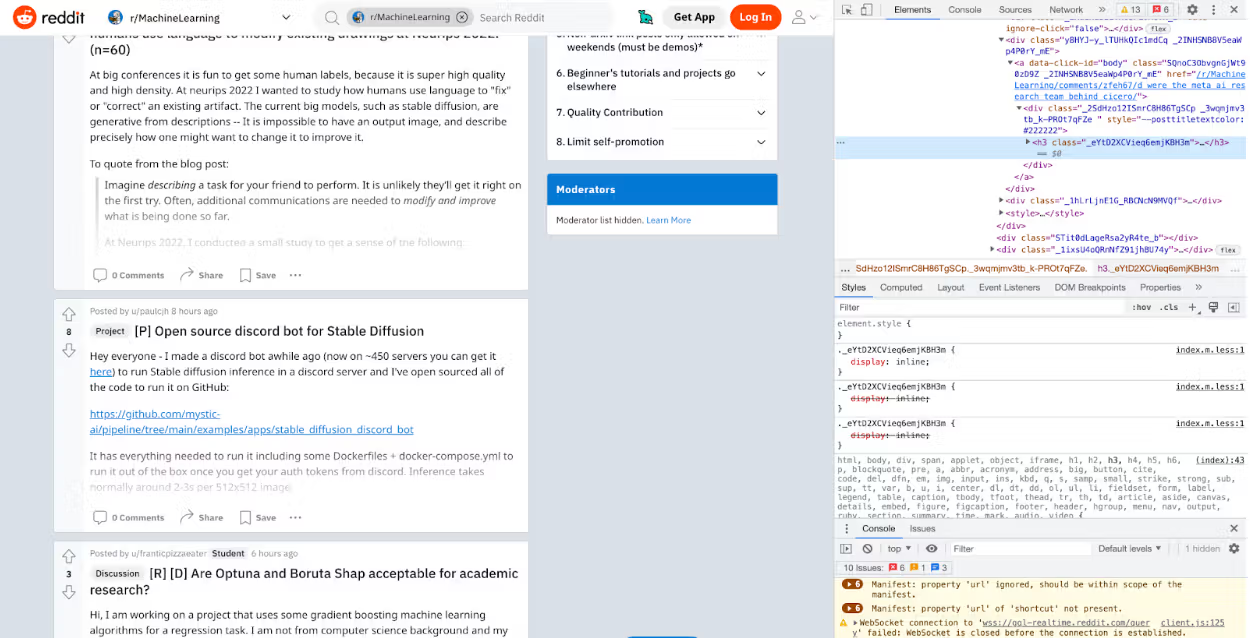
Let’s use this inside the css() function with text and the extract() function afterward to scrape text from there.
response.css("._eYtD2XCVieq6emjKBH3m::text").extract()
Here is the output, which contains the thread opening in Machine Learning.
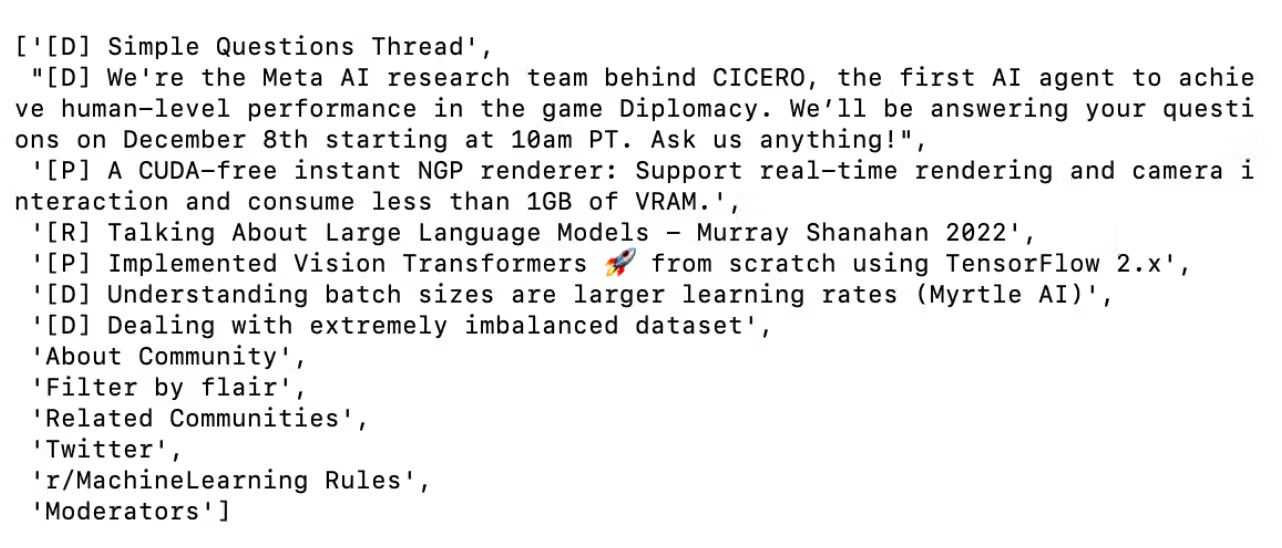
Also, the extract_first() function is called on the resulting selection to extract the first matching element. In his case, the code attempts to extract the text of the first element with the following class.
To select the first thread for our example, we will use the extract_first() function.
response.css("._eYtD2XCVieq6emjKBH3m::text").extract_first()
Here is the output.

Beautiful Soup

Beautiful Soup is a Python library used to parse HTML and XML documents.
It is commonly used in web scraping projects to extract data from the HTML or XML code of the website.
Here, we will use Beautiful Soup to scrape data from IMDB.
Scrape Top 100 Movie List From IMDB
First, let’s create an empty list that we’ll fill later.
movie_name = []
Rating = []
Then, import the requests and BeautifulSoup modules, which will send an HTTP request to the target URL and parse the HTML content of the response.
# Import necessary modules
import requests
from bs4 import BeautifulSoup
After that, we will set the URL to scrape.
# Set the URL to scrape
url = "https://www.imdb.com/search/title/?groups=top_100&sort=user_rating,desc"
In this case, the URL points to a search results page on IMDB that shows the top 100 movies sorted by user rating.
Since the top list is spread over two pages, we will split it into the first 50 and second 50, scrape data from both, and then combine two DataFrames.
Then, we will send an HTTP request to the URL using the requests.get() method, and store the response in a variable called response.
# Send an HTTP request to the URL and store the response
response = requests.get(url)
Then we will parse the HTML content of the response using the BeautifulSoup() method and store the resulting object in a variable called soup.
# Parse the HTML content of the response
soup = BeautifulSoup(response.content, "html.parser")
In the next step, we will use the soup.select() method to extract the film titles from the page.
The IMDB list class is shown in the screenshot below. We will select from the class and the tag simultaneously by using “.lister-item-header a “.
If you want to find out more about how you can scrape from the website by using Beautiful Soup, here is its documentation.
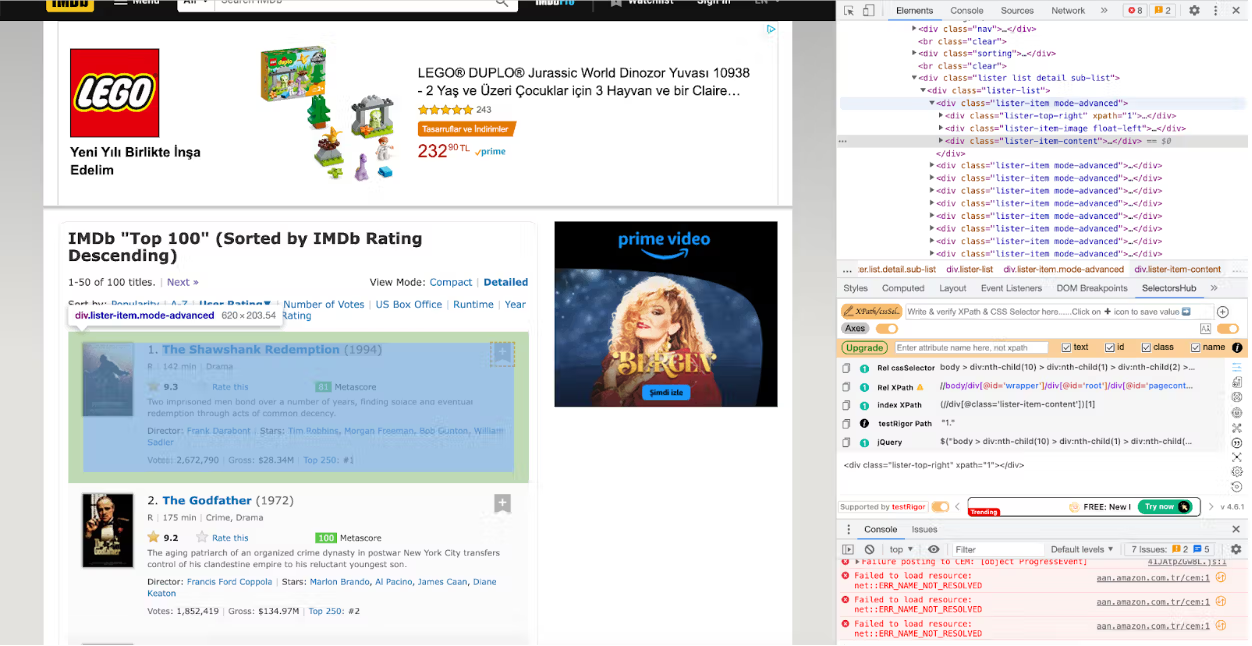
# Find all the <div> elements with the class "lister-item mode-advanced"
movies = soup.find_all('div', class_='lister-item mode-advanced')
This method uses a CSS selector to identify the location of the elements on the page that contain the film titles.
The titles and IMDB ratings are stored in a list called film titles.
Next, we will iterate over the list of titles and IMDB ratings and add each to the list we created.
# For each movie, extract the title and rating
for movie in movies:

    title = movie.h3.a.text
    movie_name.append(title)

    rating = movie.strong.text
    Rating.append(rating)
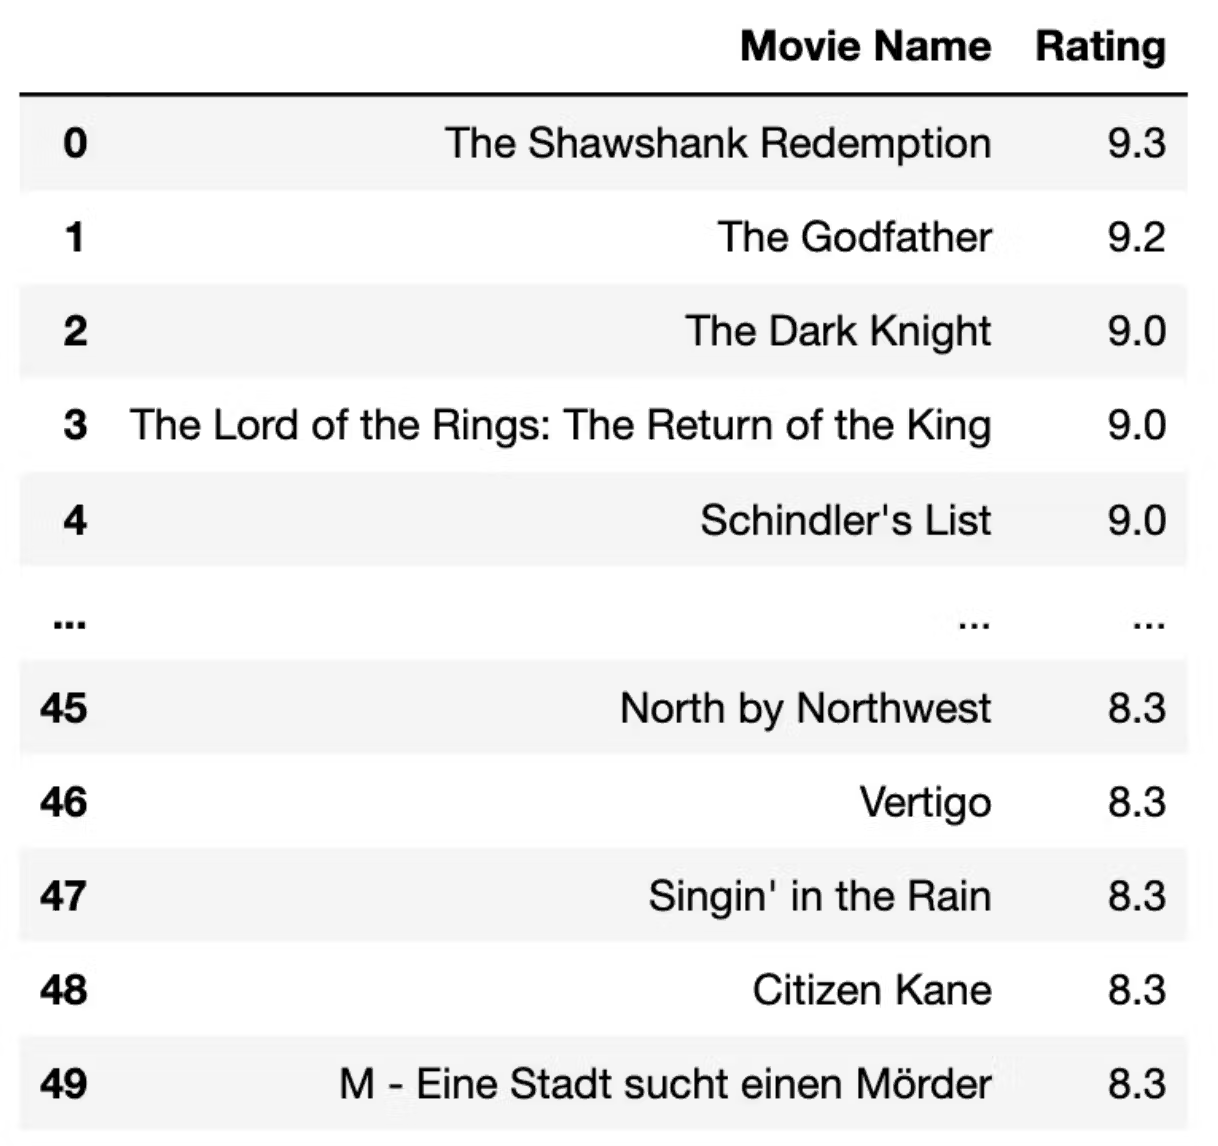
In this step, we will create a dictionary first, then turn this dictionary to the DataFrame, and see the top 5 elements of it.
Finally, we will display the first 5 rows to see the top 5 list.
dic = {"Movie Name" : movie_name, "Rating" : Rating}
df = pd.DataFrame(dic)
df.head(5)
Here is the output of our code.
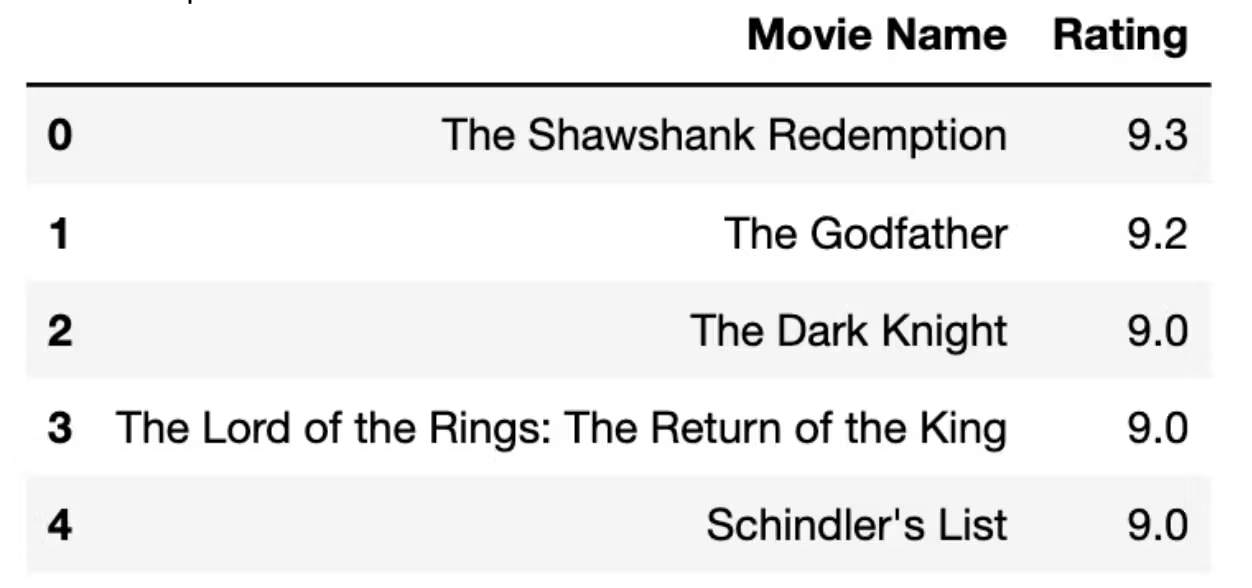
At this stage, we will repeat the process once again, but this time we will use another link because the link of the 51-100 is different.
movie_name_2 = []
Rating_2 = []

import requests
from bs4 import BeautifulSoup

# Send an HTTP request to the URL of the webpage you want to access
url = "https://www.imdb.com/search/title/?groups=top_100&sort=user_rating,desc&start=51&ref_=adv_nxt"
page = requests.get(url)

# Parse the HTML content of the page
soup = BeautifulSoup(page.text, 'html.parser')

# Find all the <div> elements with the class "lister-item mode-advanced"
movies = soup.find_all('div', class_='lister-item mode-advanced')

# For each movie, extract the title and rating
for movie in movies:

    title = movie.h3.a.text
    movie_name_2.append(title)

    rating = movie.strong.text
    Rating_2.append(rating)

dic2 = {"Movie Name" : movie_name_2, "Rating" : Rating_2}
df2 = pd.DataFrame(dic2)
df2.head(5)
Here is the output of our code.
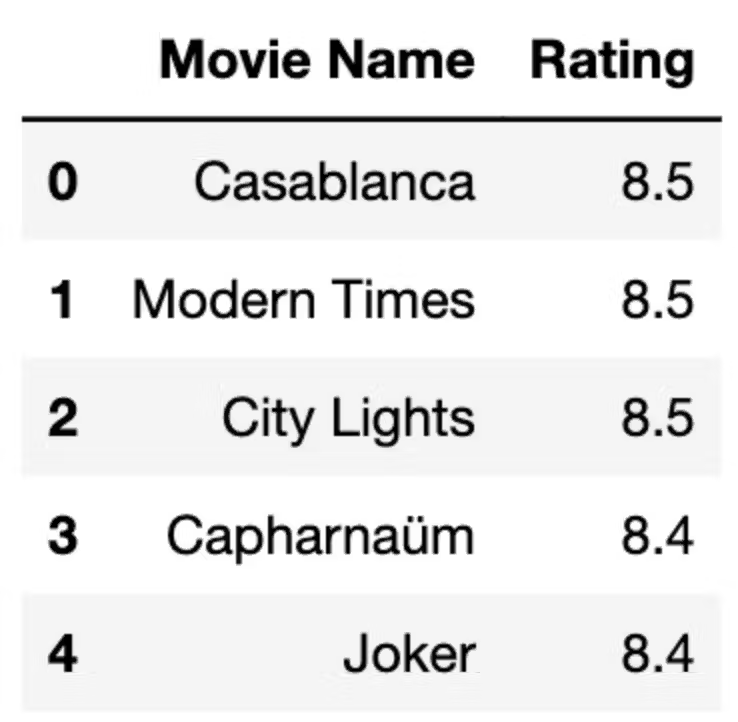
The remaining steps are the same.
In the final step, we will merge two DataFrames, and here we have IMDB's top 100 movie list.
imdb_top_100 = df.append(df2)
imdb_top_100
Selenium

Selenium is used to automate web browsers. It is commonly used in the automated testing of web applications. You can write scripts to perform actions that control a web browser, like clicking links and filling out forms.
It can also be used for web scraping.
Scrape From Wikipedia
In this example, we’ll scrape data from Wikipedia by using selenium. We’ll use it on the article about machine learning.
First, let’s import a web driver to locate your driver in your working directory. Then import By. We will use it to locate the place that we want to scrape.
We should also look at the source of the web page you want to scrape by right click first and then clicking inspect.
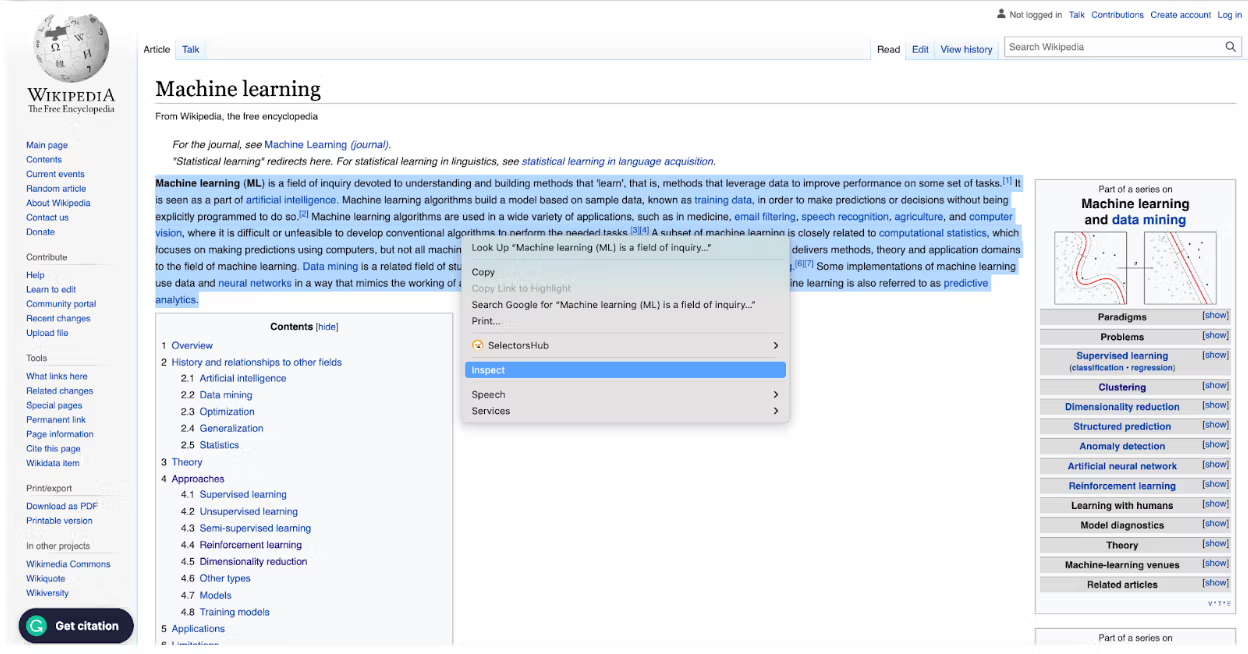
In this example, as you can see below, we will scrape data from the “p” tag. That’s why we will use By.TAG_NAME as an argument in the find_element function.
Here you can see the other argument options and usage.
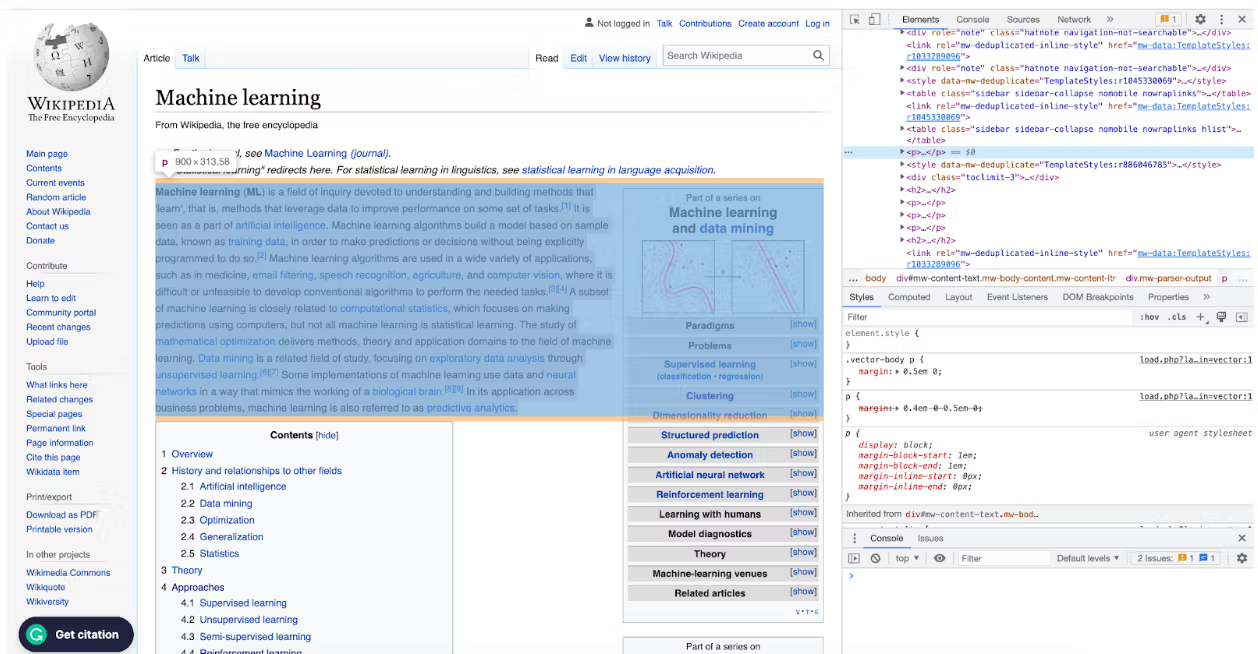
So now, after selecting the tag, we will extract the element's text using the text function and assign them to the content_element. Then we will print it to see the output. Of course, as a final step, we will close the driver.
# Import the necessary libraries
from selenium import webdriver
from selenium.webdriver.common.by import By

# Set the path to the ChromeDriver executable
chromedriver_path = "/Users/randyasfandy/Downloads/chromedriver"

# Use Selenium to open the webpage in Chrome
driver = webdriver.Chrome(chromedriver_path)
driver.get("https://en.wikipedia.org/wiki/Machine_learning")

# Find the element containing the page content

content_element = driver.find_element(By.TAG_NAME, "p")


# Extract the text of the element
content_text = content_element.text

# Print the content to the console
print(content_text)

# Close the web browser
driver.close()
Here is the output of our code.

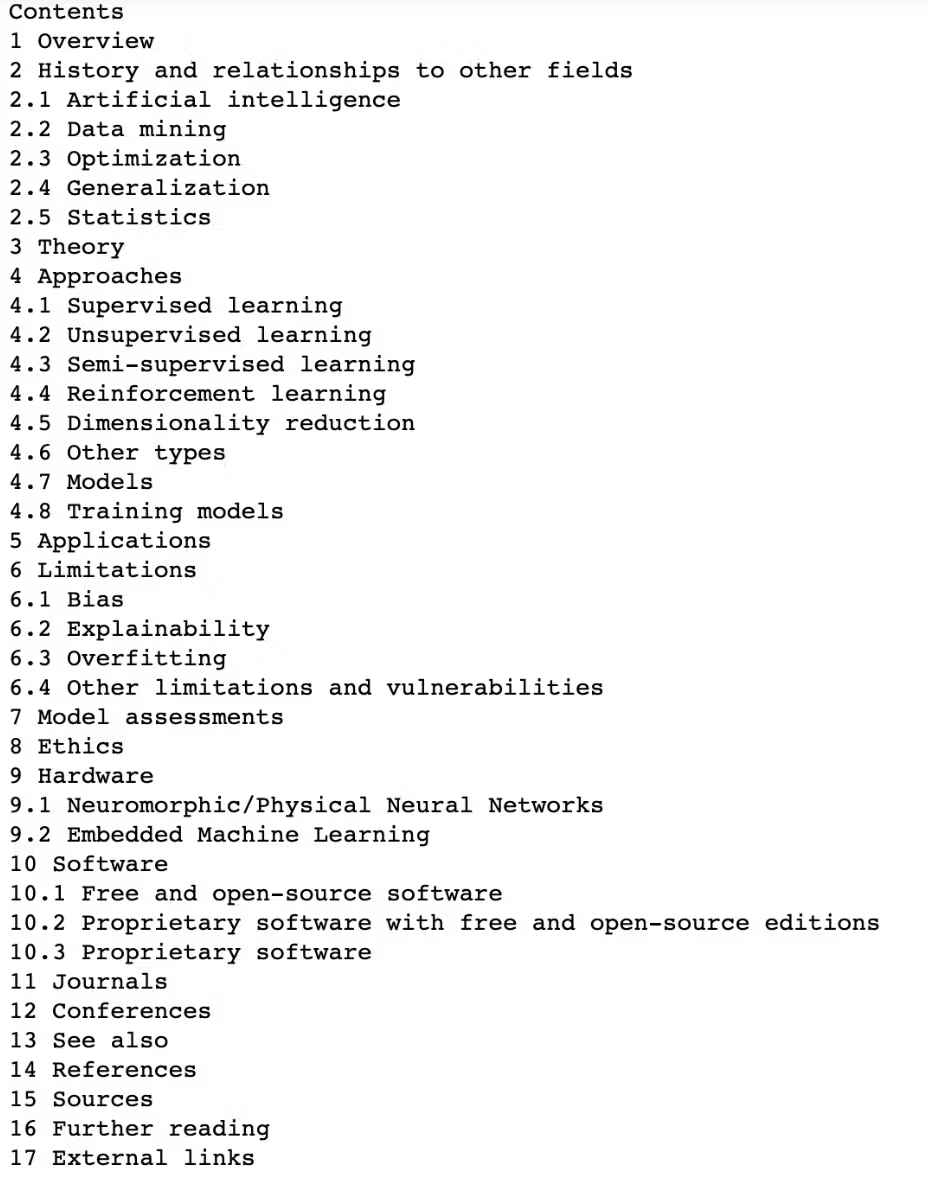
Let’s scrape the content table to scrape anything we want from this website. To do that, we will repeat the whole process, we just will change the arguments in the find_element() function. If you inspect the HTML of the page, you can see that the content_table has “toc” id. So we can use that one to scrape the content table.
Here is the code.
# Import the necessary libraries
from selenium import webdriver
from selenium.webdriver.common.by import By

# Set the path to the ChromeDriver executable
chromedriver_path = "/Users/randyasfandy/Downloads/chromedriver"

# Use Selenium to open the webpage in Chrome
driver = webdriver.Chrome(chromedriver_path)
driver.get("https://en.wikipedia.org/wiki/Machine_learning")

# Find the element containing the page content

content_element = driver.find_element(By.ID, "toc")


# Extract the text of the element
content_text = content_element.text

# Print the content to the console
print(content_text)

# Close the web browser
driver.close()
Now, let’s see the output.
Now, let’s see what dimension reduction means. The whole process is the same as above, yet we will use XPath this time.
To see the XPath of the element you want to scrape, you can use SelectorsHub as a plug in your browser.
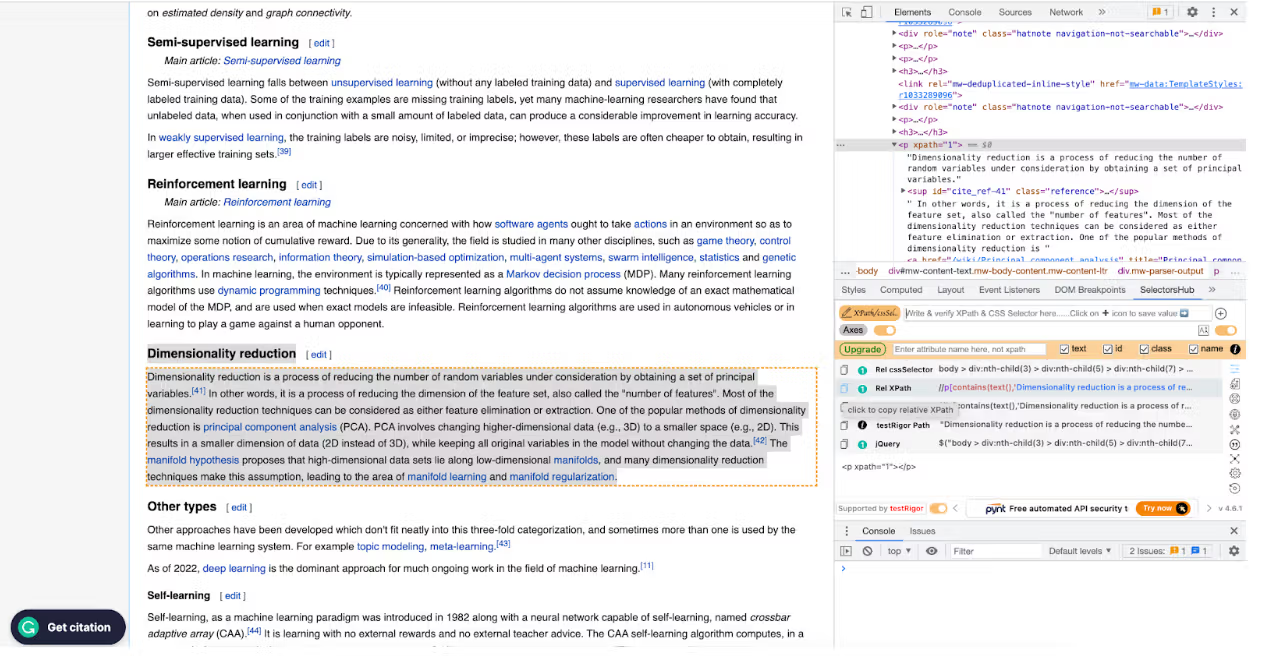
We obtained XPath using SelectorsHub, and we will change the argument of the find_element() function to By.XPATH, and we will add the XPath there.
Here is our code.
# Import the necessary libraries
from selenium import webdriver
from selenium.webdriver.common.by import By

# Set the path to the ChromeDriver executable
chromedriver_path = "/Users/randyasfandy/Downloads/chromedriver"

# Use Selenium to open the webpage in Chrome
driver = webdriver.Chrome(chromedriver_path)
driver.get("https://en.wikipedia.org/wiki/Machine_learning")

# Find the element containing the page content

content_element = driver.find_element(By.XPATH, "//p[contains(text(),'Dimensionality reduction is a process of reducing ')]")


# Extract the text of the element
content_text = content_element.text

# Print the content to the console
print(content_text)

# Close the web browser
driver.close()
And this is the code output.

Requests

It is a python library that makes it easy to send HTTP requests. It is generally used in web scraping projects to fetch the HTML and XML code of a website. It also works with a Beautiful Soup library.
Let’s first import it and define the URL we want to scrape to see how it works. In this example, we will scrape from our blog.
The requests.get() function sends the request and returns a response object that includes the server’s response.
Let's use the content function with our result to see all the content that our website has.
import requests
URL = "https://www.stratascratch.com/blog/"
r = requests.get(URL)
print(r.content)
Here is our output, which includes everything in the website.

The form is unstructured, as you can see. Beautiful Soup library is used with a request to scrape any data from these unstructured forms and make it meaningful by using data analysis tools.
Let’s do that by using the power of data visualization.
StrataScratch Last Blog Post
We will repeat the same process, yet after getting content, we will use html.parser to specify the HTML content that should be parsed. Then we will assign our result to the Soup.This Soup object now contains the parsed HTML content of the page.
We will use soup.h4.get_text() to find the first h3 element in the page and then return all text in this element, in this example, it will be the last article posted on our blog here.
import requests
from bs4 import BeautifulSoup

# Make a request to the website
url = "https://www.stratascratch.com/blog/"

# Parse the HTML content of the page

soup = BeautifulSoup(requests.get(url).content, 'html.parser')

print(soup.h3.get_text())
Here is the output of our code.
Output:

StrataScratch Blog Posts
Now, let’s find all the articles on our website.
To do that, we will create an empty list to store the result. Then we will import our libraries and pandas because we will work with DataFrames. We will reuse the above code, yet one thing has changed: we will use the for loop to find all h3 tags and append the result to the list we already created.
After that, we will create a DataFrame from our list. Then, we’ll change the DataFrame column name by using the rename() function, and after that, we will use the head() function to see the first rows of our DataFrame.
list = []
import requests
from bs4 import BeautifulSoup
import pandas as pd


# Make a request to the website
url = "https://www.stratascratch.com/blog/"

response = requests.get(url)
soup = BeautifulSoup(response.text, 'html.parser')

# Parse the HTML content of the page

for tag in soup.find_all('h3'):
    list.append(tag.string)
df = pd.DataFrame(list).rename(columns = {0: "Article Names"})
df.head()
Here is the output.
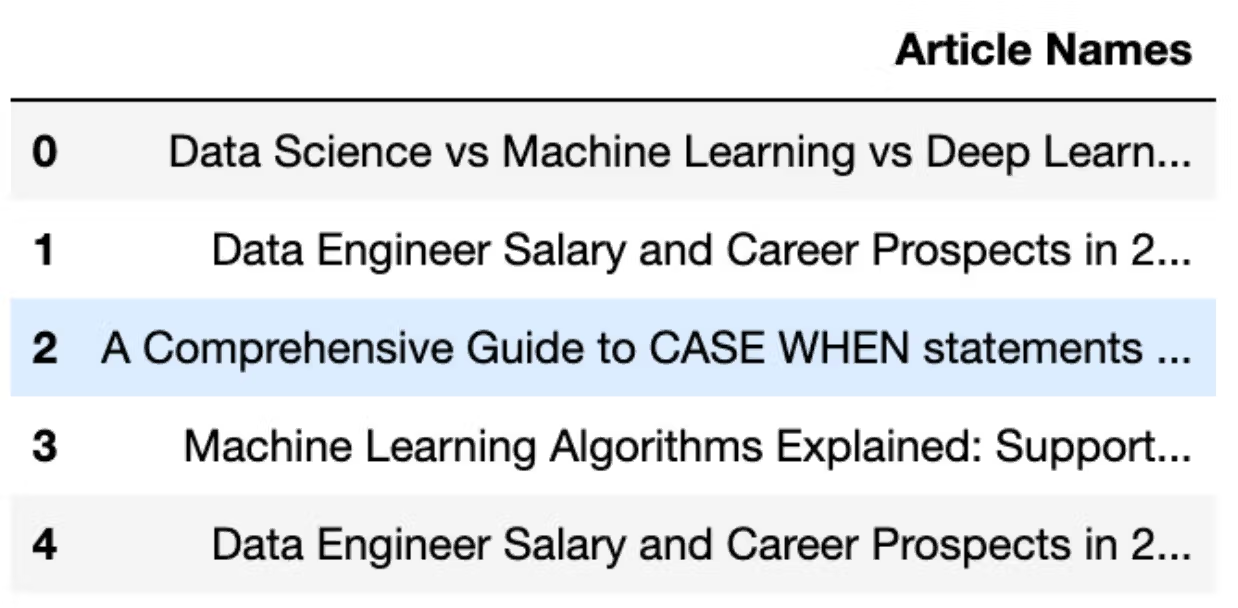
Now let’s turn all this into meaningful information by using the power of data visualization with the WorldCloud library.
WordCloud
We will run the code for one article to see how WorldCloud works.
First, we will import the Matplotlib and WorldCloud libraries, which will help us see the general structure of the words that have been used in the titles of our articles.
Then we will select the first article’s name using bracket indexing from our DataFrame. After that, we will create a WordCloud image by using generate() function with WordCloud(), and as an argument, we will use text that we already defined.
As a final step, we will use the imshow() function, equal interpolation to bilinear, use the axis() function with off, and then we will use the show() function to see the plot.
Here is the code.
from wordcloud import WordCloud
import matplotlib.pyplot as plt
from wordcloud import WordCloud, STOPWORDS, ImageColorGenerator

# Start with one review:
text = df["Article Names"][0]

# Create and generate a word cloud image:
wordcloud = WordCloud().generate(text)

# Display the generated image:
plt.imshow(wordcloud, interpolation='bilinear')
plt.axis("off")
plt.show()
Here is the output.
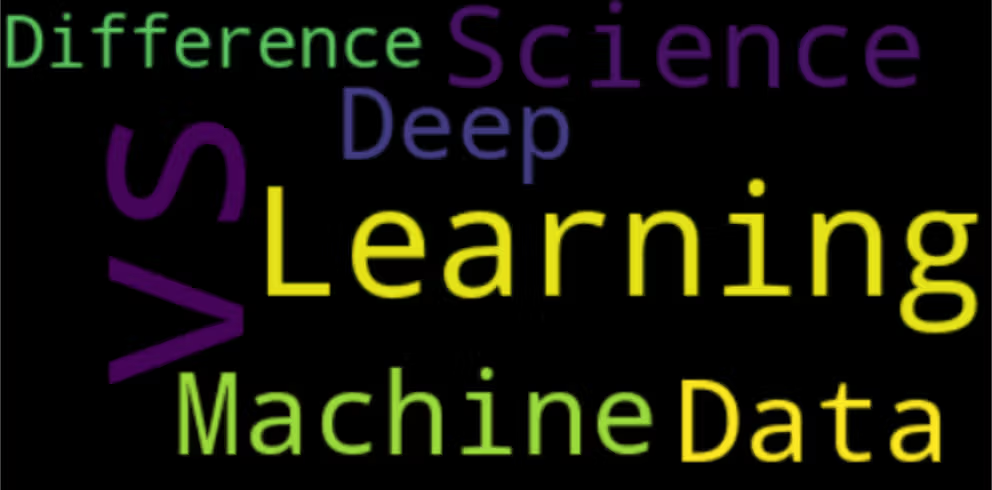
Now, let’s implement all article's titles that we scrape.
To do that, first, we should stick all strings in these titles together.
text = " ".join(review for review in df["Article Names"])
print ("There are {} words in the combination of all review.".format(len(text)))
Here is the output.

Now, let’s generate a WordCloud for all the StrataScratch articles that we scrape.
# Generate a word cloud image
wordcloud = WordCloud(stopwords=stopwords, background_color="white").generate(text)

# Display the generated image the matplotlib way:
plt.imshow(wordcloud, interpolation='bilinear')
plt.axis("off")
plt.show()
Here is the output.

Now, let’s see the description of these articles.
description = []
import requests
from bs4 import BeautifulSoup

# Make a request to the website
url = "https://www.stratascratch.com/blog/"
response = requests.get(url)
soup = BeautifulSoup(response.text, 'html.parser')

for tag in soup.find_all('p'):
    description.append(tag.string)
description
Here is our description.

It seems we accidentally scraped the subscription text. Also, the text should be cleaned a little bit.
Here is the code to do that. We will remove the first step by using a slicer. Then we will join the text that does not contain the number. After that, we will remove the e-mail subscription text, and also we will remove “â\x80\x99” .
d2 = description[1:8]
res = ''.join([i for i in d2 if not i.isdigit()])
res.replace("Become a data expert. Subscribe to our newsletter.", "")
resl = res.replace("â\x80\x99", "''")
Now, let’s see our text again.

Alright, now this will be our final step.
Let’s see the WordCloud of our articles’ descriptions.
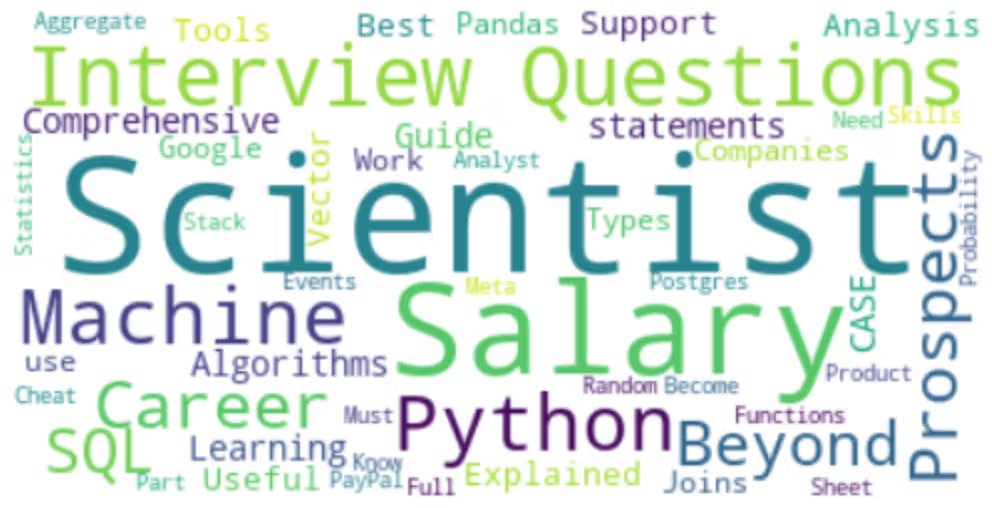
Conclusion
Data collection is a crucial step in any data science project. Its purpose is to gather and organize your data from different sources. In Python, many libraries make this process easy for you.
In this article, we explained the most popular libraries for data scientists. And if you plan to collect data, the four most important ones are mentioned.
Request, Scrapy, Selenium, and Beautiful Soup are four of the most powerful data collection libraries in Python. You saw various real-life examples of collecting data from different sources, such as Wikipedia, reddit, IMDb, and our own website StrataScratch.
Every data scientist should understand these libraries and how to use them effectively to create a novel project.
Share
